Drawing is a skill anyone can learn.
November is National Novel Writing Month– or NaNoWriMo. In case you’ve never heard of NaNoWriMo, it’s a challenge to write a 50,000 word novel in 30 days. The idea is that, by setting aside some time to write a little each day, in one month you’ll have written an entire novel.
For those of you who wish to be creative during the month of November, but have no interest in writing a novel, here’s another creative challenge you can take during the month of November. The challenge is learning to draw in 30 days.
 When I was in elementary school, we had art class. However, the art teacher would simply place the art supplies in the middle of the table at the start of class and tell us “to draw”. That’s it: she never gave us any instructions on how to do it.
Therefore, I never learned to draw. In addition, I was under the impression that drawing was a talent which I simply didn’t possess. That is, until I started doing research on how to learn new skills and realized that anything can be learned–if the right approach is used.
I’m currently working on a video course called “Learn Skills Fast”. One of the skills that I taught myself by following the method that I came up with is drawing. This post is roughly based on the process that I followed in order to learn to draw.
The first thing that I did was identify the three primary resources that I would use. These are the following:
- You Can Draw in 30 Days: The Fun, Easy Way to Learn to Draw in One Month or Less by Mark Kistler. Kistler is an artist who has been teaching drawing—mostly to children—for many years.
- The New Drawing on the Right Side of the Brain by Betty Edwards. First published in 1979, this book is a classic.
- Keys to Drawing by Bert Dodson. Dodson shares 55 keys to drawing.
However, my learning methodology involves taking charge of your own learning experience, and using several resources in order to make sure that you’re learning in the way that is best suited to you and your needs. Therefore, you’ll see me referencing other sources—in addition to the three books mentioned above—throughout this post.
Resolve to set aside one-hour-a-day throughout the month of November to learn to draw–with graphite pencils–and then follow along with this post. Below you’ll discover how to learn to draw in 30 days.
Day 1 of the Learn to Draw in 30 Days Challenge – The Sphere
Kistler indicates that to start drawing all you need is a regular No. 2 pencil with an eraser, and a sketch pad. I got a 30-page sketch pad at the pharmacy for $1.99. You probably already have a No. 2 pencil, so go out and get a sketch pad. With a tiny investment, you’re ready to get started.
Start by drawing an airplane, a donut, and a house so you can measure your progress. Take ten minutes right now and do this (it’s OK if it’s terrible, you’re learning how to draw).
The first thing that most drawing tutorials teach you to draw is shapes, starting with a sphere. After all, any object that you see around you can be constructed by using one, or a combination of, three different shapes:
- A circle – a sphere is a circle in 3D.
- A square – a cube is a square in 3D.
- A triangle – a cone is a triangle in 3D.
In addition, there are two more 3D forms:
- A pyramid, which is a variation of the cube.
- A cylinder, which is a variation of the cone.
Look at the following illustration by Edward A Burke:
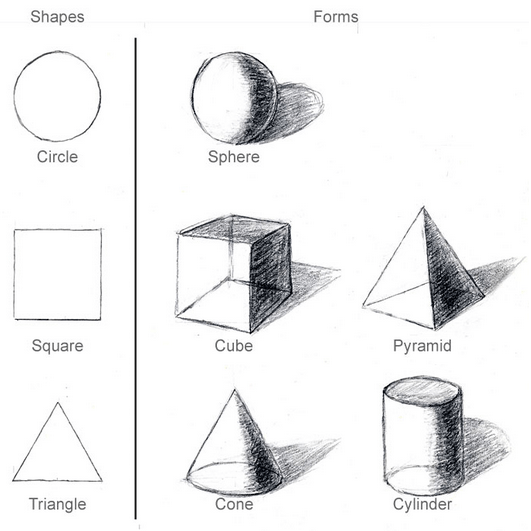
These shapes and forms help us to simplify the complex information in front of us. A useful drawing strategy is to work from the largest, most general shapes, to the smallest and most specific.
We’re going to learn to draw the shapes and forms in the image above, one at a time, starting with the sphere. As was stated above, a sphere is a circle in 3-D. The way in which you turn a circle into a sphere is with shading and shadow.
Here is a video of Kistler’s lesson on how to draw a sphere (don’t just watch the video–follow along and draw a sphere): Day 1 of Learning to Draw in 30 Days.
Day 2 of the Learn to Draw in 30 Days Challenge – Value
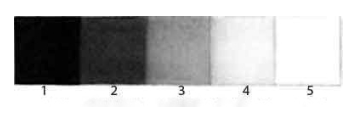
“Value”–also referred to as “tone”–is simply how dark or light something is. It’s used in drawing to depict light and shadow to create a three dimensional illusion. Kistler provides very vague instructions on shading and shadowing, so I did additional research on this.
The first step in understanding value is to create a value scale. Value scales run from black to white, with several different shades of gray in between. You’re going to start out by creating a value scale with five squares. The first square is going to be black, and the last square is going be white. The other three squares will be gray, as follows:
- Dark gray.
- Middle gray.
- Light gray.
It should look like this:
 You can create your value scale in any of three ways:
- Press down harder on the pencil for the dark colors.
- Use more layering for the darker colors.
- Use pencils of different grades.
What you think of as a “lead pencil” isn’t made of lead at all. Instead, these pencils are made of a mixture of clay and graphite. This core of clay and graphite is referred to as the pencil “lead”. The pencil lead is placed between wooden halves, which are glued together.
Manufacturers alter how soft or how hard a pencil is by changing the amounts of clay and graphite that they use in the lead. Hard pencils (H) have a lighter value because they leave less graphite on the paper. On the other hand, soft pencils (B) have a darker value because they leave more graphite on the paper.
Graphite pencils range fron 9B (the softest and darkest), to 9H (the hardest and lightest). The full range of drawing pencil grades looks like this:
9H, 8H, 7H, 6H, 5H, 4H, 3H, 2H, H, HB, F, B, 2B, 3B, 4B, 5B, 6B, 7B, 8B, 9B
However, you don’t need the whole range of graphite pencils. I have a set of Staedtler Mars Lumograph pencils which range from 6H to 6B.
However, once again, you don’t need to go out and buy pencils at this point. If you prefer, you can stick to your normal Nº 2 pencil (which roughly corresponds to HB in the scale above) and press down harder, or add more layers, to get the darker tones. Press down softer to get the lighter tones.
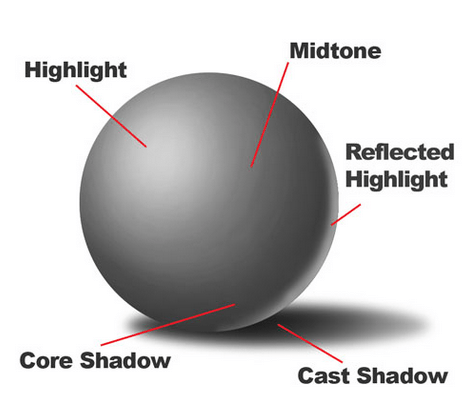
Take a look at the value scale you created. When you draw a sphere, you’re going to use these five different tones. Look at the following:
- The darkest tone is going to be the cast shadow.
- The dark gray is going to be the core shadow.
- The middle gray is going to be the midtone.
- The light gray is going to be the reflected highlight.
- The white is going to be the highlight.
Now, draw a sphere with proper shading and shadowing by following along with this video: How to Draw a Sphere.
Day 3 of the Learn to Draw in 30 Days Challenge – Objects Shaped Like a Sphere
The reason you want to learn to draw a sphere is so that you can draw objects that have a spherical shape. One such object is an apple. To further grasp–and practice–the concepts of shading and shadows, draw an apple in 3D by following along with the tutorial below.
The Basics of Highlights, Midtones, and Shadows
Look around and notice all of the sphere-shaped objects that surround you. You’ve taken the first step to be able to draw those objects.
Day 4 of the Learn to Draw in 30 Days Challenge – The Cube
As was stated in Day 1, the cube is one of the fundamental shapes/forms you should learn to draw. As you’ll discover in Days 5 and 6, once you know how to draw a cube you’ll be able to draw many different things, including houses. Learn to drawa cubes by following along with Kistler in this video: The Cube.
Day 5 of the Learn to Draw in 30 Days Challenge – Advanced Cubes
Now that you can draw a cube, you can draw hollow cubes–like boxes or chests–, and you can draw all sorts of cube-shaped things. Start off by following along with Kistler in the three videos below:
In addition, once you can draw cubes, you can also draw all sorts of cube-shaped ojects. Practice by drawing a printer by following along with this video: Drawing Box Shaped Things.
Day 6 of the Learn to Draw in 30 Days Challenge – Draw a House
Most houses are shaped like cubes. So, once you know how to draw cubes and advanced cubes, you can draw a house. Start off by drawing this simple house (turned into a milk carton): Constructing With Cubes.
Then, move on to this more complex house: Advanced-Level House.
Day 7 of the Learn to Draw in 30 Days Challenge – Draw Cylinders
The next fundamental shape that you’re going to learn to draw is the cylinder. Again, there are many objects and things all around you that are shaped like cylinders, including bottles, candles, lipsticks, and so on.
Draw a cylinder with Kistler by following along with this video: The Cylinder.

Once you can draw a cylinder, draw an object shaped like a cylinder. How about a can? It can be a soup can, a can of beans, a soda can, and so on. Follow along with this video: Draw a Can of Coke.
Look around and count how many cylinder-shaped objects you can find. You’re well on your way to being able to draw them.
Day 8 of the Learn to Draw in 30 Days Challenge – Draw a Pyramid
The next fundamental shape/form that you’re going to learn to draw is the pyramid. The roof of most people houses are pyramind shaped. In addition, blocks of cheese, perfume bottles, and paper weights can be shaped like pyramids.
Follow along with this video and draw a pyramid: How to Draw a Pyramid.
Day 9 of the Learn to Draw in 30 Days Challenge – Draw a Cone
Cones are another shape that show up all over the place. Learn to draw cones by reading the instructions in the article below.
Once you’ve learned how to draw a cone, draw an ice cream cone. Follow along with this video: How to Draw a Cartoon Ice Cream Cone.
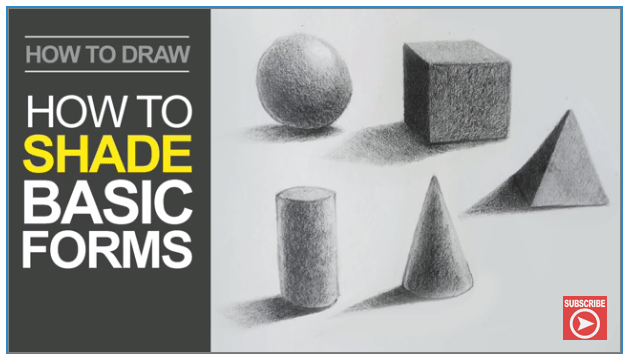
Day 10 of the Learn to Draw in 30 Days Challenge – Shade Basic Forms
You already learned how to shade a sphere. Here’s how to shade all of the basic forms you’ve learned how to draw: How to Shade Basic Forms.
Day 11 of the Learn to Draw in 30 Days Challenge – Structure Basics
Once again, the reason that you’re learning to draw geometric shapes is because anything that you may want to draw is made up of one or more geometrtic shapes. You have to learn to notice the shapes in the objects around you, and draw them.
Now that you know how to draw the basic geometric shapes, here’s a great video on how to use those shapes and put them together to create great drawings: Structure Basics – Making Things Look 3D.
Then, use the shapes that you’ve learned to draw and draw this lamp: Draw Anything Using the Four Basic Shapes.
Day 12 of the Learn to Draw in 30 Days Challenge – Overlapping Objects
The challenge in drawing is taking a three-dimentional object from real life and creating a realistic representation of it on a piece of paper, which is a two-dimentional surface. In other words, you have to find a way to create the illusion of depth, space, and distance. There are several “tricks” that artists use to achieve this.
So far, we’ve covered one way to create the illusion of depth: shading and shadows. Here are six more ways to create the illusion of depth:
One. Varying Sizes – Objects are drawn larger in the foreground and smaller the farther back you want them to appear.
Two. Placement – The objects that are drawn lower down on the page appear to be closer to you than the objects that are drawn higher up.
Three. Color and Value – Items that are closer to you appear darker than the objects that are farther away. If color is used, items that are closer appear to be warmer in color.
Four. Detail – Objects that are closer contain more details than objects that are farther away.
Five. Linear Perspective – By using one, two, or three-point perspective, artists can make objects appear closer or father away.
Six. Overlapping – Overlapping is placing one object in front of another. The object that is in front seems to be closer than the object that is behind. In addition, objects with interrupted edges appear to be further away than those with complete contours.
Today we’re going to take a look at the sixth way to create the illusion of depth: overlapping. The next video you’re going to take a look at has Kistler demostrating how to draw lilies. However, he goes further that that. He draws three lilies that overlap.
Follow along with this video and draw overlapping lilies: Lovely Lilies.
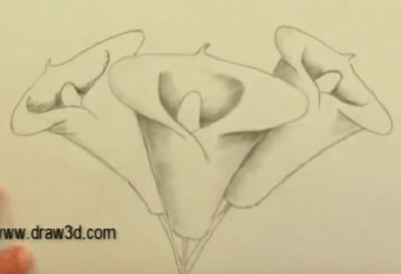
Notice that Kistler drew the lily in front first, and then he added the two in the back. In the book The Fundamentals of Drawing: A comprehensive drawing course for the beginning artist, Tom Dowdalls recommends that you begin with a quick sketch of the objects that are farther back, and then draw the ones that are in front. Try both ways and notice which one works best for you.
Day 13 of the Learn to Draw in 30 Days Challenge – Draw Ellipses
An ellipse is simply an elongated–or a foreshortened–circle. You’ve already drawn ellipses since a cylinder is basically two ellipses connected by two perpendicular vertical lines. However, due to the importance of the ellipse, here’s a video that explains how to draw this shape: Drawing Ellipses.
And here’s some more guidance on how to draw using ellipses: Drawing An Ellipse Step-by-Step.
Now, draw this vase using ellipses: Ellipse Perspective.
Day 14 of the Learn to Draw in 30 Days Challenge – Curves
Curves are found all over the place, so it’s important to learn how to draw them. You’ve already drawn lillies, so you already know how to draw curves. Get better at drawing curves by drawing flags, scrolls, and roses.
Follow along with Kistler in this video: How to Draw a Rose With Mark Kistler.
Day 15 of the Learn to Draw in 30 Days Challenge – Cross Contour Lines
A contour is a line which defines the outline of an object. It’s a depiction of the outer edges of the object that you’re drawing, without adding any additional details. Cross-counter lines are lines that reflect the movement of your eyes around the objects that you see.
Cross-contour lines can be horizontal or vertical. They help us to described the form, and its shape, more accurately by varying the thickness of our lines or shading along the cross-contour lines.
Cross-contour lines will improve your drawing by making them more three dimensional and by communicating form. Watch the three videos below for an excellent explanation of of cross-contour lines.
Then, draw an apple using cross-contour lines by following along with this video: Drawing An Apple With Cross-Contour Lines.
Day 16 of the Learn to Draw in 30 Days Challenge – Draw A Tree
Draw a tree with a realistic-looking trunk, branches, and foliage by following along with this video: How to Draw a Tree with Mark Kistler. Then, get even better at drawing trees by drawing another tree. Follow along with this video: Draw a Tree With Pencil.
Day 17 of the Learn to Draw in 30 Days Challenge – Draw A Donut And An Airplane
At the very beginning of this challenge you drew a house, a donut, and a airplane to help you measure your progress. On Day 5 of the challenge you drew a house again, this time with instructions from Kistler. Now you’re going to draw a bagel and an airplane once more.
Follow along with the videos below:
- Draw a Donut (the donut starts at 14:09).
- Draw an Airplane.
How much did you improve? I don’t know about you, but I improved a lot in just 17 days.
Day 18 of the Learn to Draw in 30 Days Challenge – Draw a Hand
Although a lot of people think that it’s difficult to draw hands, it’s just a matter of drawing some simple shapes. A hand is simply a square, a triangle, and a few cylinders.
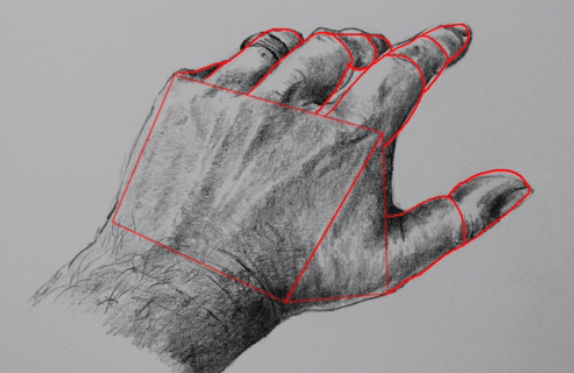
Draw a hand by following along with this video: How to Draw Hands.

Day 19 of the Learn to Draw in 30 Days Challenge – Texture
“Texture” used in the context of drawing refers to the way an object looks as it may feel if it were touched. For example, if you’re drawing a tree, you want to create a bark-like texture. As a second illustration, if you’re drawing a dog you want to create a fur-like texture.
There are different techniques that are used to create the illusion of texture. As an illustration, the book “The Art of Drawing Animals” explains that to draw short fur–on a dog, for example–, you would do the following:
- Create an undercoat with a series of swift, short strokes with a 2H pencil. Draw the fur in the direction of the fur growth.
- Use an HB pencil to create a second layer. Don’t cover the entire area–leave some of the page white for highlights.
- Switch over to a 2B pencil and go over the area again.
That is, texture is created by using different pencil movements, pencils of different grades, creating highlights, and so on. Here are two videos to watch to learn how to create texture:
To practice texture, draw four squares (2″ x 2″ each). In each square, practice one of the following textures: tree bark; wood, brick, and metal.
You’ll be drawing a squirrel and the squirrel’s fur on Day 28.
Day 20 of the Learn to Draw in 30 Days Challenge – Blind Contour Drawing
Up until this point you’ve been following along as different artists draw some object or other. However, if you want to learn to draw you need to learn how to to “see”. That is, you want to train your brain and your hand to be able to translate what you see into a drawing.
There are many exercises that will help you to do this. Blind contour drawing is one of them. Specifically, it’s an exercise in which an artist draws the contour—or outline—of a subject, without looking at the paper as they draw.
This drawing technique was first introduced by Kimon Nicolaides in his book, “The Natural Way to Draw”. It was further popularized by Betty Edwards. The purpose of the exercise is to strengthen eye-hand coordination.
Draw your left fist using blind contour drawing by following along with this video: Blind Contour Drawing.
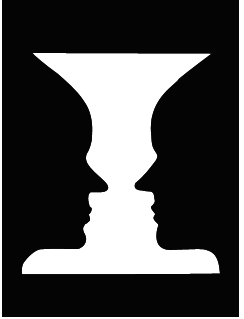
Day 21 of the Learn to Draw in 30 Days Challenge – The Vase/Faces Exercise
There’s a famous optical illusion image which is called Vase/Faces, because you can either see a vase, or two faces in profile. One of the drawing exercises recommended by Edwards involves the following:
- She gives you a template with one side of the vase (or with one face in profile).
- You have to complete the other side.
Go ahead and do this exercise. Download the template here. Then, complete the exercise by following along with this video: Vase/Faces Tutorial.
Day 22 of the Learn to Draw in 30 Days Challenge – The Grid Method
The Grid Method will help you to reproduce an image that you’re trying to draw. It consists of taking the image and drawing a grid over it. Then, draw a grid of equal ratio on the paper you’re going to draw the image on. Lastly, you draw the image, one square at time.
Read this explanation on how to use the grid method: The Grid Method. Then, use the grid method to draw a horse (or the head of a horse) by following along with this video: How to Draw a Horse.
Day 23 of the Learn to Draw in 30 Days Challenge – Upside Down Drawing
Edwards argues that by drawing upside down you can create a shift between your left brain–which is logical and lineal–and your right brain. Theoretically, right brain thinking will allow you to access your ability to draw.
Upside Down Drawing will allow you to the following:
- Learn to see lines in relation to each other, rather than as preconceived shapes.
- Develop observational skills.
Do the following:
- Take an image and turn it upside down.
- Then, copy it. Just draw the shapes and lines that you see, without trying to make sense of what you’re drawing
You can use the image below:
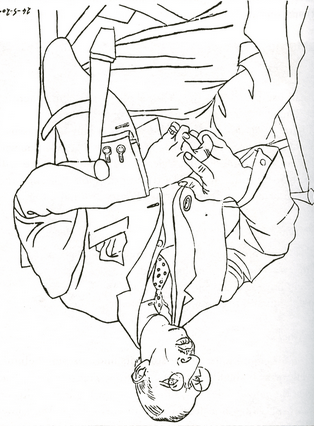
In addition, draw the image by following along with this video: Upside Down Drawing.
Day 24 of the Learn to Draw in 30 Days Challenge – Drawing Negative Space
Another exercise recommended by Edwards is drawing negative space. Positive space refers to the main focus of a picture, while negative space refers to the background. In negative space drawing, instead of observing the positive shape of an object, you draw the shape of the space around the object.
Here’s a great explanation of how to draw negative space: Positive and Negative Space.
Now, grab a pair of scissors, place it on a white sheet of paper, and draw the negative space around the scissors. Then, take some paper clips and do the same thing. You can follow along with this video: Positive Negative Space.
Day 25 of the Learn to Draw in 30 Days Challenge – One Point Perspective
What is perspective? Perspective is all about creating depth in your drawings. Here’s a quick introduction to perspective in drawing: Understanding Perspective.
One-point perspective is when everything converges toward one vanishing point on the horizon. It’s typically used for roads, railroad tracks, or hallways. Draw this city landscape using one-point perspective: One-Point Perspective Cityscape.
Day 26 of the Learn to Draw in 30 Days Challenge – Two Point Perspective
Two-Point perspective uses two vanishing points on the horizon line. In this type of perspective, you are viewing the object or scene so that you are looking at one corner, with two sets of parallel lines moving away from you.
Draw this bedroom in two-point perspective: Two-Point Perspective Bedroom.
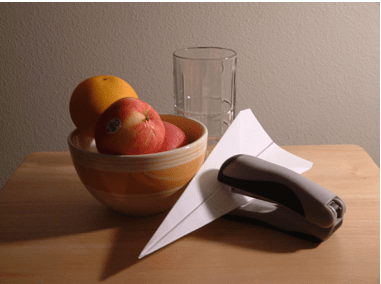
Day 27 of the Learn to Draw in 30 Days Challenge – Draw a Still Life
A still life is a genre of painting. Specifically, it’s a painting or drawing that features an arrangement of inanimate, everyday objects. These objects often include a vase–with or without flowers–, a piece of fruit, and a bottle of wine. This genre is great for those who are learning to draw because it teaches you to see like an artist.
In addition, drawing still lives will teach you proportion. Look at the following:
- You want to maintain the right proportion between the height and width of an object.
- When an object has different sub-parts it’s important to draw the sub-parts the right size in relation to each other.
- In addition, each object has to have the correct proprotion in relation to the other objects that make up the still life.
Here are some guidelines for drawing a still life:
- Spend some time observing the composition.
- Simplify the forms. What basic shapes do you see in each object?
- Start drawing the shapes that you see in a rough fashion (a circle for an apple, a long cylinder for a candle, a rectangle for a book, and so on). Use a light pencil; you’ll erase most of these lines later.
- Use a pencil to measure proportions.
- Just draw the essential lines at this point. You’ll be adding in the details later.
Follow along with the instructions you’ll find in this blog post, and draw the still life below.
Day 28 of the Learn to Draw in 30 Days Challenge – Draw a Squirrel
You’re going to practice drawing texture by drawing a squirrel. Follow along with this video to draw the basic outline of the squirrel and get a general idea on how to create the fur texture for the squirrel: How to Draw a Squirrel.
Then, get the details on how to create the squirrel’s fur in this video: How to Draw Fur.
Day 29 of the Learn to Draw in 30 Days Challenge – Draw a Face
The face has very specific proportions that you need to adhere to if you want to draw it realistically. Here are some guidelines:
- The eyes are halfway down the head.
- The edge of the nostrils line up with the tear ducts of the eyes.
- The space between the eyes is the same as the width of each eye.
- The head is five eyes wide.
- The corners of the mouth line up with the pupils of each eye.
Draw a quick and simple girl’s face by following along with this tutorial: How to Draw a Female Face.

Day 30 of the Learn to Draw in 30 Days Challenge – Choose An Object to Draw
For Day 30, choose an object and draw it. As an illustration, you can choose to draw one of your running shoes. Use any of the techniques that you learned during the last 29 days to draw it. He are some possibilities:
- Identify the different shapes that you see in your running shoe and draw those shapes. Then, fill in the details.
- Make a blind contour drawing of it.
- Take a photograph of your running shoe and print it out. Draw a grid on the photo. Then, draw a grid on a piece of paper, and draw the running shoe that way.
- Draw the negative spaces around the shoe.
Conclusion
Did you enjoy the 30-day drawing challenge? How much did you improve? Live your best life by learning to draw.


Related Posts:
- Thirty 30-Day Challenges to Jump-Start the Best Version of Your Life
- How Thinking In Reverse Can Make You More Creative
- Nine Creativity-Sparking Tips
- Stuck for An Idea? Try SCAMPER
Did you enjoy this article? Subscribe to “Daring to Live Fully” by clicking here and get free updates.
 Marelisa Fabrega is a lawyer and entrepreneur. She holds a Bachelor of Science in Business Administration from Georgetown University in Washington, D.C., as well as a Juris Doctor from the Georgetown University Law Center. You can learn more about her