≡ Menu

One of the most important skills you can acquire is to learn how to read a book.

There’s an important distinction between reading for relaxation and entertainment, or reading just for information, on the one hand, and reading for understanding, for deepening your mind, and for acquiring insight, on the other.

onehouradayformula banner longMortimer J. Adler–who wrote the classic “How to Read a Book” in 1940–explains the art of reading consists of having the skills required to take a book and use it to lift your mind up from understanding less, to understanding more. Adler’s book, which was rewritten with the collaboration of Charles Van Doren in the 1970’s, will initiate you into the true art of reading. This post will show you how the wisdom contained in “How to Read A Book” will make all your future reading more enjoyable and worthwhile.  In addition, it will show you how to use books written by others to create something new.

Reading for Information v. Reading for Understanding

Adler and Van Doren explain that the goal that you set for yourself when you’re going to read any text-whether you’re reading for entertainment, information or understanding-should determine the way in which you read. Reading for entertainment is very simple.

But what’s the difference between reading something for information, and reading for understanding?

When you read something–such as a magazine, a newspaper, a blog post, and so on–which is completely intelligible to you, your store of information might increase, but your understanding doesn’t. Your understanding was equal to these texts before you read them. Otherwise, you would have felt the puzzlement and perplexity that comes with reading something that is out of your depth.

When you read something that at first you don’t completely understand, then what you’re reading is initially higher than you are. The text contains insights which you lack. If you manage to acquire greater understanding after having read some text, you’ve elevated yourself through the activity of reading.

How to Read a Book – The Four Levels of Reading

The authors of “How to Read a Book” explain that there are four levels of reading, which are cumulative. That is, you can’t move on to the next level until you’ve mastered the one before. The four levels of reading are the following:

1. Elementary

Elementary is the level of reading that is ordinarily learned in elementary school. A child that is learning to read is simply trying to make sense of the squiggly lines on the page. The question at this level is: What does the sentence say? If the sentence says, “The cat sat on the hat”, that’s all the teacher wants to know.

If you try to learn a foreign language as an adult, at first, you would be back at this level. Also, if you’re trying to read at college level, but you lack the necessary vocabulary, or knowledge of grammar and syntax, you will need help with elementary reading. The current educational system often stops at the elementary level, and fails to move on to the next three reading levels.

2. Inspectional

Inspectional reading is scanning and superficial reading. You do this in order to get a general idea of what a text is about, and the type of information that it contains, in order to determine whether it’s something which you’re actually going to take the time to sit down and read.

At this level you want to know what type of book it is –a novel, a biography, a historical treatise, and so on–and what the book is about. You’re just acquiring superficial knowledge of the book at this point: it’s as if you were on a reconnaissance mission.

3. Analytical

Analytical reading is thorough reading. This level of reading is very active: the reader is making the book his or her own. Analytical reading is done for the sake of understanding.

The authors of “How to Read A Book” point out that Francis Bacon once remarked that “some books are to be tasted, others to be swallowed, and some few to be chewed and digested.” Reading a book analytically is chewing and digesting it.

4. Syntopical

When reading syntopically, the reader reads several books on the same topic, not just one. The objective is to be able to construct an analysis of the subject matter which cannot be found in any of the books. You’ll be making novel connections and coming up with new insights.

The levels of reading are further discussed and explained below.

Level Two: Inspectional Reading

Even though “How to Read A Book” devotes a chapter to the elementary level of reading, we’re going to jump straight into level two: inspectional reading.

The first thing you want to do when you pick up a book is decide what you want to get out of reading the text that’s in front of you. Are you reading for pleasure? Are you looking for an answer to a specific question? Do you want to gain general-knowledge of the subject matter of the book? What do you want to know, or what do you want to be able to do, after reading this text?

Once you know your purpose for reading the text, set a limited amount of time which you’re going to use to inspect the text in order to determine whether it’s going to help you to achieve your goal. Inspectional reading consists of two different steps: the first step is systematic skimming, or pre-reading; and the second step is superficial reading.

Systematic Skimming

Here are some suggestions offered by Adler and Van Doren on how to skim a book:

  1. You can start skimming the book by looking at the book’s subtitle, which will probably give you an indication of the scope and aim of the book. Flip the book over and look at the back cover, which usually contains information about what’s inside the book. If the book has a dust jacket, read the jacket flaps. These often contain good summaries of the most important points developed in the book.
  2. Place the book in the appropriate category in your mind: What genre does it belong to? What type of book is it? If you walk into a classroom in which a teacher is lecturing, the first thing you want to know is whether it’s a history, science, or philosophy class. Likewise, you want to know what type of book you have in your hands.
  3. Study the book’s table of contents to get a general idea of how the book is structured. In a good nonfiction book the table of contents will probably be similar to an abbreviated outline of the book.
  4. Check the index, if the book has one. Look at the range of topics, and the types of books and authors that the book refers to. Identify crucial terms by the number of references under them. You might want to go ahead and read some of the passages that contain these crucial terms in order to get an idea of the crux of the book, and what the author’s main arguments are.
  5. Read the book’s introduction, preface, and foreword. If the most important chapters in the book contain summaries, read those.
  6. Now start leafing through the book, quickly dipping in and out, reading a paragraph here and there. If something catches your attention, you may want to read two or three pages in sequence, but no more than that.

Once you’ve skimmed the book in this way you should be able to decide whether the book is likely to meet your objectives, and is therefore something you’re going to read carefully, or if you’re just going to set it aside. Even if you decide not to read the book at this point, it’s now part of your mental catalogue and you may decide to read it at some future date.

Superficial Reading

If you decide, after skimming, that the book meets your objectives and that you’re going to go ahead and read it, then move on to the second step in inspectional reading, which is to read the book superficially.

The authors explain that the first time that you read a difficult book you should read it once through without stopping to look up terms that you don’t understand, or ponder over concepts that are new to you. Just pay attention to what you do understand, and don’t worry about those things which you can’t immediately grasp.

Adler and Van Doren are not suggesting that you avoid consulting a dictionary, an encyclopedia, or other materials and references in order to try and make sense of the difficult passages in a text that you’re trying to read. They just caution that you shouldn’t do it prematurely.

When you’ve read through the book once superficially, you can go back to the parts that you didn’t understand and look up anything that you want to.

Why is it so important that you read the book once through without stopping?

  • First of all, what you understand the first time you read the book–even if it’s just about 50% of the text–will help you to make sense of the rest of the book the next time you read it.
  • Second, if you stop frequently to look things up it’s very likely that you’ll get frustrated and bored, decide that the book is too difficult for you, and just set it aside.
  • Third, constant starting and stopping may make you miss the forest for the trees.
  • And fourth, reading the book quickly once through will allow you to form your own impressions about the book, before you start reading commentaries by others on what the book is trying to say.

Make the Book Your Own

The authors of “How to Read a Book” are big proponents of marking up your books. They say the following:

“When you buy a book, you establish a property right in it, just as you do in clothes or furniture when you buy and pay for them. But the act of purchase is actually only the prelude to possession in the case of a book. Full ownership of a book only comes when you have made it a part of yourself, and the best way to make yourself a part of it—which comes to the same thing—is by writing in it.”

While reading a book, you should be holding a conversation with the author, asking questions, making comments, and so on. Do the following:

  • Write your questions and comments in the margins.
  • Underline key sentences.
  • Circle things you want to come back to.
  • Place an asterisk next to a passage you find particularly interesting.
  • Highlight key words.
  • Write your observations and short summaries of what you have just read at the top and bottom of the page.
  • Place the number of other pages which are related in the margin.

Make the book your own.

Level Three: Analytical Reading

Analytical reading–the third level of reading–consists of three different stages. Each stage consists of several rules, for a total of fifteen rules of analytical reading. This is further developed below:

First Stage: What Is the Book About As A Whole?

The first stage of analytical reading consists of 4 rules which have the objective of helping you to determine what the book is about and to outline its structure. These four rules are:

Rule 1. Classify the book according to kind and subject matter.

Rule 2. State what the whole book is about with the utmost brevity. That is, you’re going to state what the book’s theme is–its main point– in a single sentence, or at most a few sentences (a short paragraph).

Rule 3. Divide the book into its main parts and outline those parts.

Rule 4. Define the problem or problems the author is trying to solve. What questions is the author trying to answer?

Second Stage: What is Being Said in Detail, and How?

The second stage of analytical reading consists of four rules for interpreting the book’s contents:

Rule 5. Understand the terms and keywords the author uses. Keywords are those which are emphasized, repeated, defined, and/or italicized. You can find the meaning of those words from the context.

Rule 6. Grasp the author’s most important propositions. Propositions are the author’s judgments about what is true or false. They’re also the author’s answers to the questions he or she posed in the book.

Rule 7. What are the author’s arguments in support of his or her conclusions? What are the grounds, or reasons, the author gives for having arrived at his or her judgments and conclusions?

Rule 8. Determine which of his problems the author has solved, and which he has not; and as to the latter, decide which the author knew he had failed to solve.

Third Stage: Do You Agree With the Author’s Arguments and Conclusions? What of it?

The third stage of analytical reading sets down the rules for criticizing the book.

Rule 9. You must be able to say, with reasonable certainty, “I understand,” before you can say any one of the following things: “I agree,” or “I disagree,” or “I suspend judgment.”

Do not begin criticizing until you have completed your outline and your interpretation of the book. As Adler and Van Doren point out: “Reading a book is a kind of conversation. The author has had his say, and then it is the reader’s turn.”

Rule 10. When you disagree, do so reasonably, and not disputatiously or contentiously.

Rule 11. Demonstrate that you recognize the difference between knowledge and mere personal opinion by presenting good reasons for any critical judgment you make.

Rule 12. Show wherein the author is uninformed.

Rule 13. Show wherein the author is misinformed.

Rule 14. Show wherein the author is illogical.

Rule 15. Show wherein the author’s analysis or account is incomplete.

Level Four: Syntopical Reading

It’s been said that anyone can read five books on a topic and be an expert. However, becoming an expert really depends on how you read those five books. If you read them analytically, you’ll be able to give a good explanation of the arguments and opinions presented by the five different authors that you just read.

But what you really want to do is read the five books syntopically, so that you can develop and present your own unique perspective and insights, make novel connections, and contribute something new to the field.  That’s what will really make you an expert.

Inspectional reading (reading level two) is critical to syntopical reading. Once you’ve put together a bibliography of books on your subject-matter which look promising, you must quickly indentify which of these are among the best five (10, or 15).  You do this by inspecting all of the books on your list.  Once you’ve decided which books deserve the time and attention to be read carefully, you can apply the five steps of syntopical reading.

The five steps of syntopical reading are the following:

Step 1: Find the relevant passages. You’re going to inspect the books you’ve chosen once again in order to select the passages from the books which are most germane to your needs.  It is unlikely that any of the books will be of use to you in its entirety.

Step 2: Establish a common terminology. In analytical reading, you identify the author’s chosen language by spotting the author’s terms of art and keywords. But now you’re faced with a number of different authors, and it’s unlikely that they all use the same terms and keywords.   At the syntopical level of reading you’re going to either choose the terms and keywords used by one of the authors, or come up with your own terminology.

Step 3: Clarify the questions. Decide which are the questions that you’re going to answer.  You want to come up with a set of questions which shed light on the problem which you intend to solve.  At the same time, the questions should be stated in such a way that all, or most of, the authors that you’re reading can be interpreted as giving answers to them.

Step 4: Define the issues. It’s very likely that not all of the authors answered your questions in the same way. When experts have differing or contradictory responses to the same question, this means that an issue has been defined.

Step 5: Analyze the discussion. Now you’re free to analyze the discussion. Identify and compare where each of the authors stands on the issue you’ve identified.

  • Why are the authors saying what they’re saying?
  • Who do you agree with?  Why?
  • Did you come up with an entirely different conclusion (thereby adding unique value)?

You’re holding a discussion with the experts on the issues which you’ve identified, and by this point you should be conversant enough on the subject matter to be able to hold your own.

Conclusion

If you follow the process laid out in “How to Read a Book”, you’ll be continuously lifting your mind by reading–and understanding–books which contain insights and perspectives which are new to you. In addition, you’ll be able to become an expert in your chosen topic by using books written by others in order to ask your own questions, come up with your own answers, discover new connections, and draw new conclusions.

Live your best life by mastering the true art of reading.


banner make it happen

one hour a day header-2

guidebook of dreams banner how to be creative banner

Related Posts:
miracle morning

If you want to have a great day, start with a great morning.

Hal Elrod is the bestselling author of “The Miracle Morning: The Not-So-Obvious Secret Guaranteed to Transform Your Life (Before 8AM)”. In “The Miracle Morning”, Hal reveals the six morning habits that helped him to rebuild his life after he lost just about everything.

Here’s Hal explaining the importance of developing good morning habits:

onehouradayformula banner long
“How you wake up each day and your morning routine (or lack thereof) dramatically affects
your levels of success in every single area of your life. Focused, productive, successful mornings
generate focused, productive, successful days—which inevitably create a successful life—in
the same way that unfocused, unproductive, and mediocre mornings generate unfocused,
unproductive, and mediocre days, and ultimately a mediocre quality of life. By simply changing
the way you wake up in the morning, you can transform any area of your life, faster than you
ever thought possible.”

I’ve started applying the six habits of the Miracle Morning in my life, and I’ve gotten fantastic results. Therefore, I wanted to share these habits with you. Below you’ll discover what the six habits of the Miracle Morning are, as well as ideas on how to start applying these habits in your own life.

Habit Stacking

Before I tell you what the six habits of the Miracle Morning are, it’s important to talk about habit stacking.  Habit stacking is grouping together a set of short, easy to carry out habits. The habit stack is then treated as a single action.

Although the Miracle Morning consists of six different habits, you’re going to stack them together and treat them as a single action. That is, each habit is going to trigger the next one, so you do one after the other. Look at the following:

  • Waking up triggers the first habit.
  • Finishing the first habit triggers the second habit.
  • Finishing the second habit triggers the third habits, and so on, until you’re done with all six habits.

The Six Habits of the Miracle Morning – SAVERS

Elrod uses the acronym SAVERS to make it easier for people to remember the six morning habits—or daily practices–that make up the Miracle Morning. Here’s what each letter of the SAVERS acronym stands for:

S – Silence. Start your day with silence. This can mean taking a few deep breaths, meditating, repeating a mantra to yourself, and so on. The point of this habit is to start the day with calm clarity and a peaceful mind.

A – Affirmations. We all know the importance of positive self-talk. The second habit of the Miracle Morning will allow you to begin the day with encouraging words which will motivate you to go after your goals with a feeling of confidence and self-efficacy.

V – Visualizing. With this third habit of the Miracle Morning you’ll be taking a moment to see yourself in your mind’s eye going through your day, doing what needs to be done, and making things happen.

E – Exercise. The fourth habit of the Miracle Morning is to exercise to get your heart pumping and get oxygen flowing to your brain. It will wake up your body and prepare your brain to meet the challenges the day will undoubtedly bring.

R – Reading. We all know that input determines output. By adding the habit of reading to your morning you’ll be starting the day by filling your brain with inspirational words and/or knowledge that will help you to accomplish your daily to-dos.

S – Scribing. The habit of journaling will allow you to clarify your thoughts and feelings by putting them down on paper.

Ideas for SAVERS

How you apply each of the six habits in your life is entirely up to you. In this section I’m going to share with you some ideas for you to choose from.

Silence

Here are five ideas for the habit of silence:

  • Sit on the edge of your bed and give thanks for the day that’s about to begin.
  • If you’re religious, say a prayer.
  • Follow along with a meditation app, such as Headspace.
  • Try a conscious breathing exercises, or pranayama, such as alternate nostril breathing.
  • Slowly move your awareness through your body. As you focus on each body part—your eyes, ears, mouth, throat, and so on—be grateful for everything that body part does for you.

Affirmations

Here are four ideas for affirmations:

Visualizing

Visualizing is simply picturing and feeling yourself achieving your goals, being the person you want to be, and having the experiences you want to go through. Here are four ideas for visualizing:

  • Sit down, close your eyes, and create a detailed mental picture of the things you want to come to pass, using all of your senses. See yourself taking action so that these things come to be in your life.
  • Create a vision board filled with images that represent the goals you want to achieve. Then, every morning, sit down and review your vision board.
  • Create a mind movie by collecting images that represent your goals and using them to create a video. Then, every morning, sit down and watch your video.
  • Look through your to-do list for the day and see yourself in your mind’s eye going through your day, being calm, productive, efficient, and full of joy.


Exercise

Here are five ideas for exercise:

Reading

Here are four ideas for reading:

Scribing

Here are some ideas for scribing:

  • Answer a question such as: “What am I looking forward to today?” or “What good will I do today?” Some argue that you can have a happier life by asking yourself the following question each morning: “Is the world inherently good or bad?”
  • Think of a challenge you’re having and brainstorm ideas on how to overcome it.
  • Write about your most important task of the day and how you plan to tackle it.
  • Write down a list of things you’re grateful for.
  • Write one sentence about what you hope the day will bring.
  • Create a mind map for the day.
  • Write in your journal.

Length of Time for Each Habit

Ideally, you’ll be spending an hour on your Miracle Morning — about ten minutes for each habit.

However, Elrod recognizes that most people don’t have an hour in the morning that they can devote to these practices. If that’s the case, he says that you should start by doing each habit for just one minute. That way, the Miracle Morning will require just 6 minutes from start to finish.

Then, if you can, gradually begin waking up earlier and adding more time to each habit.

Conclusion

By adopting the six habits of the Miracle Morning you’ll be setting your mental, physical, emotional, and spiritual dials to the “well-being” setting at the start of the day. How do you plan to adopt each of these habits? Live your best life by starting each day with the Miracle Morning.

You can download a PDF you can use to plan out your SAVERS below.


banner make it happen

one hour a day header-2

guidebook of dreams banner how to be creative banner

Related Posts:

chunk down goals

The key to achieving big goals is to chunk them down into small pieces.

You’ve got goals. They can be small goals which can be accomplished in a month; mid-sized goals which can be accomplished in three to six months; or larger goals which will take a year or more to complete. Your goals probably include things like the following:

onehouradayformula banner long
  • Achieve a healthy weight and be physically fit by exercising and eating right.
  • Become financially independent by creating several sources of passive income.
  • Live and work in a clean, decluttered, and organized environment.
  • Learn to speak French.
  • Get a job as a coder.
  • Read the world’s literary masterpieces.
  • Run a half-marathon.
  • Land a well-paying job in a field that you’re passionate about.

In order to achieve any of these goals—or any goal that you can think of–, you have to chunk it down into manageable pieces.

There are three methods that I use to chunk down goals. I’ve found these methods to be very effective, and I wanted to share them with you, so you can break down your goals into small pieces which you can then comfortably tackle, one-by-one.

Here are the three methods I use to chunk down goals:

  • Chunk Down Goals by Time
  • Chunk Down Goals by Quantity
  • Chunk Down Goals by Actionable Steps

Below you’ll find an explanation of each of these methods, as well as examples, so you can apply them in your own life to help you achieve your goals.

Chunk Down Goals by Time

As I already shared in my post, The One-Hour-A-Day Fast Track to Goal Achievement, a while back I was working lots of overtime at the job I then held, I wasn’t exercising, and I was eating out a lot and making bad food choices. I gained a lot of weight as a result.

Once I decided I’d had enough of being overweight, I acted. I visited a nutritionist, and together we came up with a plan of how I was going to lose the 30 pounds that I had gained, in three months. She gave me a menu of the things that I was going to be eating during that time, and she also told me that I had to walk for one hour, every day.

As you can see, a big component of chunking down my goal of losing 30 pounds was to walk for a specific amount of time—one hour–each day. That is, I chunked down the goal of losing weight by time.

Many other goals can be chunked down by time, including the following:

  • Manage stress by meditating for 15 minutes a day.
  • Master the piano by practicing for 40 minutes a day.
  • Get organized by decluttering for 10 minutes a day.

My favorite way to chunk down goals is by devoting one-hour-a-day to each of my important goals.

Chunk Down Goals by Quantity

A second method you can use to chunk down goals is by quantity. That is, set a quota. I shared with you on this blog that I read Leo Tolstoy’s “War and Peace” in 2017. “War and Peace” is over 1300 pages long. That’s a lot of pages, and thinking of reading such a thick book can be daunting.

However, the book is broken down into 362 chapters. Therefore, I read it in one year by reading one chapter a day. That is, I chunked down the goal of “Read ‘War and Peace’” by quantity.

Right now I’m reading “Selected Stories of Anton Chekhov”. The collection contains Chekhov’s 30 most famous short stories. By reading one story a day, I’ll have finished reading the book in a month. Of course, if I wanted to be done faster I could do so by choosing a higher quantity. As an illustration, I could read the book in 6 days by reading 5 chapters a day.

Writing is something else that can easily be chunked down by setting a quota. For example, if you’re trying to write a novel you can set a quota of writing 3 pages a day.

As an alternative, you can set a word quota. The National Novel Writing Month challenge asks participants to write 1,667 words a day to write a 50,000-word novel in a month. That’s another way to chunk down the goal of “Write a Novel” by quantity.

Three more examples of chunking down a goal by quantity include the following:

  • Learn to draw by doing one drawing a day for a year.
  • Learn French by learning 10 words in French a day for 100 days.
  • Improve your tennis game by hitting 300 balls every day.

Chunk Down Goals by Actionable Steps

When you’re not sure how to achieve a goal, the way to chunk it down is by creating a list of actionable steps.  I’ll be using three terms to describe this method of chunking down goals:

  • Goal – the target you’re trying to hit.
  • Sub-Goals: Milestones toward the achievement of your goal.
  • Actionable Steps: The individual tasks that will allow you to achieve each sub-goal.

As an illustration, suppose that your goal is the following: “Create a Video Course”. You’ve never made videos before, and you’ve never created a course. Therefore, you don’t know how to proceed. So, what do you do?

First, decide on a deadline for your goal of creating a video course. Suppose that you decide that you’re going to create a course in the next six months. Your deadline is six months from now, so you have 180 days to achieve your goal.

Take out a piece of paper, or open a spreadsheet such as Excel, and create 180 spaces—one for each day of the following 6 months.  That’s your Actionable Steps List. It should look something like this:

  1. __________________
  2. __________________
  3. __________________
  4. __________________
  5. __________________
  6. __________________
  7. __________________
  8. __________________

Continue until you have 180 of these spaces.

Now you’re going to populate each of these spaces with an actionable step. How? Do enough research—go online, read a book on the subject matter, or talk to someone who knows how to create video courses—to be able to break down the goal of “Create a Video Course” into at least ten sub-goals.

Here’s an example of 10 sub-goals that will allow you to achieve the goal of creating a video course:

  • Select the equipment you’ll need.
  • Learn to use the equipment.
  • Choose a topic for your course.
  • Validate your topic idea.
  • Create an outline.
  • Create a script for your course.
  • Create slides.
  • Record your videos.
  • Edit your videos.
  • Launch the course.

Assign 18 days to each sub-goal (because 180 days divided by 10 sub-goals gives you 18 days per sub-goal). In other words, you’re going to come up with 18 actionable steps that will allow you to achieve each of your sub-goals.

To create actionable steps, do the following:

  • Ask: “What can I do right now to get started?” Populate the first line of your “Actionable Steps List” with whatever you come up with. Do it on Day One.
  • For the next step ask: “What needs to be done next?” You’re going to identify the next physical action that needs to be taken to keep moving forward. Populate the second line of your Actionable Steps List with the answer you come up with. Do it on Day Two.
  • Continue in this way, one step at a time, until you’re done with the first sub-goal. If you need more than 18 days to complete the sub-goal, that’s fine. Go on to the next line in the your Actionable Steps List and populate it with the next thing you need to do. If it takes you less than 18 days to complete the sub-goal, then get started with the next sub-goal.
  • When you’re done with a sub-goal, go on to the next one. Continue in this way until you’ve completed all 10 sub-goals and you’ll have accomplished your goal.

Keep two things in mind when you’re writing down each actionable step. First, ask yourself: “Can I do this right now?” If the answer is “yes”, then you have a good actionable step. If not, then you need to break it down further.

Second, make sure that what you write down is a CRUMBB, an acronym that was coined by Pat Brans, author of “Master the Moment”. That is, think of each component as a Clearly Realizable Unit that is a Meaningful Building Block. Look at the following:

  • Clearly realizable is the point that was made in the previous paragraph—it must be an action that you can take in that moment.
  • In addition to being realizable, it must be meaningful. That is, it has to help you to move closer to the completion of the sub-goal you’re working on.

I recently launched my first video course–“How to Create an Alter Ego (and why you should)“–, and I did it by chunking down my goal of “create a video course” by actionable steps.

Conclusion

Choose your most important goal and chunk it down by following one of the three methods described above. Live your best life by breaking down your goals into bite-sized pieces which you can then tackle, one at a time.


banner make it happen

one hour a day header-2

guidebook of dreams banner how to be creative banner

Related Posts:

reinvent yourself

Every so often we should reinvent ourselves.

There are many reasons for, and circumstances under which, you may want to reinvent yourself. Here are some examples:

onehouradayformula banner long
  • You’ve gone through a bad breakup.
  • You’ve suffered a big disappointment, such as a career setback, bankruptcy, or you’ve failed to achieve an important goal. Maybe you’ve even lost everything.
  • At the start of a new year (like now).
  • At a milestone birthday, such as your 30th, 40th, or 50th
  • Simply to stay fresh and current. You could choose to make it a rule to reinvent yourself periodically—say, every seven years.
  • To explore different aspects of yourself.
  • Because you feel like you’re in a rut, or you’ve grown bored with yourself (it happens).
  • You’ve been stuck in the waiting place for too long—the place in which you just sit there, waiting for something to happen–, and you can’t seem to find a way out as the current version of yourself.
  • To make a comeback after you—and everyone else—thought that you were out of the game.

Whatever reason you may have for wanting to reinvent yourself, once you’ve made the decision to make a change, the question then becomes how to do it. Below you’ll find 10 ways to reinvent yourself in 2018 (or whenever you so choose).

1. Reinvent Yourself by Learning a New Skill.

One way to describe yourself is by referring to the things you know how to do. Look at the following:

  • I’m an entrepreneur – I know how to start and run a profitable business.
  • I’m a lawyer – I know how to interpret, analyze, and apply the law.
  • I’m a cook – I know how to cook delicious, healthy meals for myself.

I can become a different person by learning new skills. As an illustration, if I learned to code I’d be a coder. I could do things I don’t have the ability to do right now: I’d be able to talk to other coders about their projects (and be part of the coding community); and I would probably view the world differently than I do now and notice more opportunities and possibilities.

Every time you learn a new skill, you change. You become someone different. Reinvent yourself by learning new skills.

2. Reinvent Yourself by Rebooting an Area of Your Life.

In my post, Reboot Your Life – 10 Ways to Get a Fresh Start, I explain that sometimes there’s one or more areas of your life in which you need to wipe the slate clean and start again. Here are some examples:

  • Give yourself a reboot by creating a capsule wardrobe for yourself that contains only things you love and look great in. A person who looks chic and well-put together is not the same as a person who wears ill-fitting clothes and suits with buttons missing.
  • Give yourself a reboot by clearing out your schedule completely. Then, re-create your schedule from scratch by adding back only those activities you absolutely have to do, and the things you really want to do. A person with a well-planned schedule is not the same as a person following a schedule filled with things that are not aligned with their goals and values.

Reinvent yourself by rebooting one or more areas of your life.

3. Reinvent Yourself by Changing Your Personality.

A great way to reinvent yourself is by changing any personality traits that are not serving you well. Although a lot of people think that their personality is set in stone, there are aspects of your personality that you’ve simply constructed. And if you created it, you can modify it.

As I explain in my post, The 20-Point Personality Chart, there’s a study that was published in the Journal of Personality and Social Psychology which suggests that if you change your behavior to match the personality changes you want to make, you can change your personality.

To illustrate, if right now you’re disorganized and constantly late for everything, you may want to become more conscientious. By acting in a conscientious manner, you’ll turn into a conscientious person. That is, you’ll be reinventing yourself into the type of person who is reliable and diligent.

4. Reinvent Yourself by Creating an Alter-Ego.

Creating an alter-ego is similar to the point above of changing your personality, but on steroids. An alter-ego is a persona created by you to help you achieve your goals and live the kind of life you want to live.

In fact, creating an alter-ego is a concept I like so much, I created an entire Udemy course on it. In my course, “How to Create a Powerful Alter-Ego (and why you should)”, I define alter-ego as follows:

  • An alter-ego is a second-self created by the individual, usually to achieve certain goals, or to live out a better version of themselves.
  • You can think of an alter-ego as a character, or a way of thinking about yourself, that accentuates or magnifies the authentic you.

Most of the time you can continue to be the old, regular you. But when it comes time to achieve an important goal, or solve a problem that you’re having, you can call on your alter-ego to get the job done. It’s an indirect way of reinventing yourself.

5. Reinvent Yourself by Changing Habits.

Suppose that you have the following habits:

  • You go to bed at 3:00 a.m.
  • You smoke.
  • You stop by a fast food place every day after work and get dinner.

Now suppose that you give up those habits, and adopt new ones. Look at the following:

  • You start going to bed by 11:00 p.m. every night;
  • You give up smoking and start exercising;
  • You stop eating fast food and start cooking yourself healthy meals, instead.

Wouldn’t you turn into a different person by making those habit changes? Yes, you would. You can reinvent yourself by changing your habits.

6. Reinvent Yourself by Changing Your Attitude.

One of the easiest ways to reinvent yourself is by changing your attitude. Although there are several attitude dualities, the most obvious is the duality between having a positive and a negative attitude.

A positive person is very different from a negative, or pessimistic, one. They perceive things differently, they feel different emotions, they react to events and circumstances in a very different way, and they simply show up in the world differently.

Do the following:

  • Think of someone you know who views the world with a positive attitude.
  • Now think of someone you know who views the world with a negative attitude.

They’re two completely different people, right? Which one would you rather be like? Probably the positive one. If so, reinvent yourself to be more like them.

7. Reinvent Yourself by Levelling Up.

Gamification—one of the buzzwords of the moment–is applying game elements to non-game situations. One element of gamification is using levels. A level is a phase you arrive at after completing the required action to get there.

A game consists of a certain number of levels, and you “win” when you reach the top level. Choose an area of your life that you want to improve in, and gamify it by deciding what each level looks like. As an illustration, right now you may be at Level 1 when it comes to physical fitness. This means you’re overweight and out of shape.

Identify what Level 2 looks like—maybe you’ve lost ten pounds and your abdomen is more defined—and the action that you need to take to get there. Proceed to do the same for each level from 1 to 10. Then, take the action necessary to level up.

By the time you reach Level 3, you’ll really start to notice a difference. By Level 5 the change will be obvious to everyone, and by the time you reach Levels 8 or 9 you’ll practically be a different person. That is, you’ll have reinvented yourself by levelling up.

8. Reinvent Yourself by Analyzing Your Personal Projects.

As I explain in my post, Flourish or Flounder: Analyze Your Personal Projects, your personal projects are the building blocks of your life. Another word for personal projects are goals. Your personal projects, or goals, can go from tiny to huge. Here are three examples:

  • Tiny goal: Eat a healthy breakfast every morning.
  • Medium goal: Start a blog and get it to 5000 subscribers in a year.
  • Huge goal: Become a doctor.

Do the following:

  • Make a list of your personal projects.
  • Evaluate each one. Are they in line with the kind of person you would like to become?
  • Discard or modify your personal projects based on your evaluation of them.
  • Come up with new projects that you find meaningful and which will make you happy.

Reinvent yourself by making sure that your personal projects are aligned with the kind of person you want to be.

9. Reinvent Yourself by Using Design Thinking.

Design thinking is an iterative process used to design products and services. However, you can apply design thinking to live a life by design. Do the following:

  • Ask yourself: How can I create the next version of myself?
  • Ideate – come up with possibilities or alternatives to begin moving toward this new version of yourself by using idea generation techniques such as brainstorming.
  • Choose the best ideas you come up with.
  • Prototype and test – find a quick and cheap way to test out your ideas. Make adjustments based on the outcomes you achieve, and prototype and test again.
  • Continue prototyping, testing, and making adjustments until you’re happy with the results.

Gradually turn yourself into the next version of yourself—that is, reinventing yourself—by generating ideas on how to move forward, prototype, and test those ideas, and make adjustments until you’ve achieved the desired outcome.

10. Reinvent Yourself by Taking 10 Steps Out of Your Comfort Zone.

Who you are is largely dependent on the current shape of your comfort zone. If your comfort zone is small, then you lead a small, uneventful, and unimpactful life. But if your comfort zone is large, then your life is full, exciting, and impactful.

The farther away you step from your comfort zone, the more you’ll change. If you take one step out of your comfort zone, that’s an improvement, but you’re still basically the same person. Taking two steps is a little better. Taking three steps is better still.

I would estimate that to constitute “reinventing yourself”, you would have to take about ten steps outside of your comfort zone. To help you get started, here are 8 Ways to Break Out of Your Comfort Zone.

Conclusion

Will you be the same person at the end of 2018 that you are at the start? It’s up to you. Should you decide to make a change, you can use any of the ten ways which I enumerate and explain above. Live your best life by reinventing yourself.


banner make it happen

one hour a day header-2

guidebook of dreams banner how to be creative banner

Related Posts:
year-end reflection

The current year is coming to an end, and it’s time to review how it went.

Self-reflection is vital if you want to live your life by design. Just as you should review each day, week, and month, at the end of each year you should set aside a block of time to review the year and reflect on it. This will allow you to do all of the following:

onehouradayformula banner long
  • Recognize your accomplishments and give yourself kudos for what you did well.
  • Reflect on the lessons you learned, as well as the knowledge and skills you acquired.
  • Acknowledge your mistakes and missteps so you can use them as a self-improvement tool.
  • Analyze how you could do better moving forward.
  • Figure out what gives you joy and what you’re truly passionate about.

One of the best ways to review your year is by asking yourself questions. Below you’ll find a set of year-end reflection questions that will help you to review how 2019 went.

50 Year-End Reflection Questions

Sit down at your computer, or take out a notebook and a pen, and fill out the answers for the following year-end reflection questions:

1. The most important goal that I achieved this year was:

2. My biggest fitness accomplishment was:

3. My biggest career accomplishment was:

4. My biggest relationship accomplishment was:

5. These are the skills I acquired this year:

6. A big mistake that I made this year—and the lesson that I learned as a result—was:

7. An obstacle or a challenge that I overcame this year:

8. This year, I learned the following about myself:

9. Here’s something I learned about other people:

10. This made me laugh the hardest this year:

11. The most fun I had all year was:

12. My best memory of the year was:

13. My biggest regret of the year was:

14. My biggest disappointment of the year was:

15. The books I read this year were:

16. My favorite movie of the year was:

17. A TV show I really enjoyed watching this year was:

18. I really enjoyed this live performance (concert, play, musical, or dance performance):

19. Here’s a song I listened to over and over again this year:

20, This is something I wish I hadn’t bought this year:

21. This is the best thing I bought all year:

22. Someone I really enjoyed spending time with this year was:

23. I adopted this new positive habit:

24. I dropped this negative habit:

25. One time I stood up for myself this year was:

26. The scariest thing I went through this year was:

27. A really cool thing I created this year was:

28. My most common mental state this year was:

29. Here’s how I grew emotionally this year:

30. Here’s how I grew spiritually this year:

31. The best gift I received this year was:

32. The nicest thing someone did for me this year was:

33. The nicest thing I did for someone else this year was:

34.  I showed real gumption this year when I:

35. If I could change one thing about this year it would be:

36. A new food/dish I tried this year was:

37. This year my physical health was:

38. Here’s a new friend I made this year:

39. This year I traveled to:

40. Here’s one adventure I had this year:

41. One contribution I made to my community was:

42. This year I spent a lot of time here:

43. This year I broke out of my comfort zone by:

44. A hobby I loved spending time on this year was:

45. This year I practiced self-care by:

46. My biggest time waster this year was:

47. Here’s a great time-saving hack I learned this year:

48. What I am most grateful for this year is:

49. Here are three words that would sum up this year:

50. If I could travel back to the beginning of the year, here’s some advice I would give myself:

New Year’s Kit

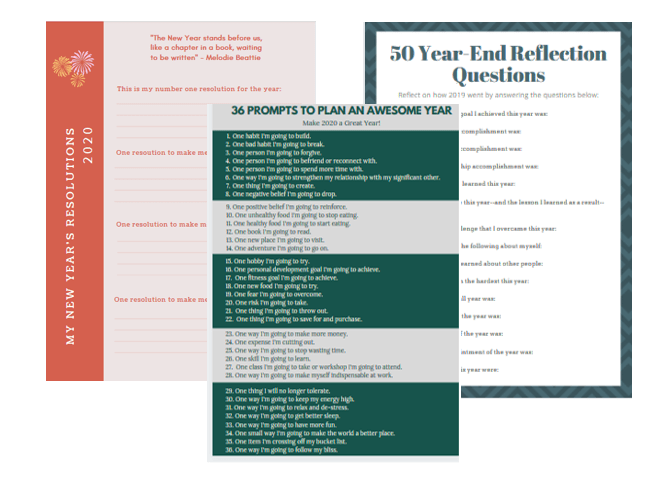
Download my free New Year’s Kit below. It contains the following worksheets:

  • New Year’s Resolutions Worksheet for you to write down your resolutions for 2020.
  • 36 Prompts to Plan An Awesome Year – use these prompts to plan your best year ever.
  • 50 Questions to Review Your Year — use these questions to review how 2019 went.

Conclusion

After reviewing and reflecting on the year that’s ending, it’s time to get ready for the year that will soon begin. No worries; I’ve got you covered. Use these New Year prompts to plan for 2020, and get ideas for your New Year’s resolutions here.

Live your best life by reviewing your year by using the 50 year-end reflection questions above. Then, start getting ready for 2020.


banner make it happen

one hour a day header-2

guidebook of dreams banner how to be creative banner

Related Posts:

gumption

In order to achieve your goals, you need lots of gumption.

What is gumption? The word “gumption” makes me think of courage, combined with enthusiasm, resourcefulness, and moxie. It’s refusing to allow the world to say “no” to you. While doing the research for this article, I came across three great definitions of gumption which I’d like to share with you.

The first definition comes from Robert M. Pirsig’s classic,  Zen and the Art of Motorcycle Maintenance, a book about a cross-country father and son motorcycle trip which grapples with complex philosophical conundrums. Here’s Pirsig on gumption:

“A person filled with gumption doesn’t sit around dissipating and stewing about things. He’s at the front of the train of his own awareness, watching to see what’s up the track and meeting it when it comes. That’s gumption.”

onehouradayformula banner longConsultant and philosopher Bob O’Connor knows what it’s like to lose it all. As he was going through his second divorce and his business was going under, he hit rock bottom. But then he made a comeback, by developing gumption. He writes about his experience in his book, Gumptionade: The Booster For Your Self-Improvement Plan.

O’Connor explains that gumption is courage + resourcefulness + common sense.  He goes further by saying that “Gumption is the power to play your hand well, to do what needs to be done, when it needs to be done.”

The third definition of gumption is from Scott H. Young. Young is a popular blogger who writes about self-improvement with a focus on autodidactism. Here’s what he has to say about gumption:

“If I had to define gumption myself (and I define words for myself all the time, so why not?), I’d say that it’s a combination of boldness and enthusiasm.  It means taking the initiative, not because you’re immune to fear or dripping with confidence, but simply because you don’t buy into all the socially programmed reasons to hold yourself back.”

And if you’re asking yourself right now why you should care about gaining gumption, it’s because it takes gumption to do all of the following:

  • Go after big, hairy, audacious goals (a term coined by James Collins and Jerry Porras).
  • Get back up after you’ve fallen flat on your face in front of the whole world.
  • Compete with people who got much more of a head start in life than you did.
  • Keep saying, “Yes, I can achieve my dreams” when the world keeps saying, “Just give up already”.
  • Persevere and keep moving toward what you want, even after you’ve come across several obstacles, gotten lost more than once, and had to take more detours than you care to remember.
  • Have the will to bear discomfort, delay gratification, and keep your eye on the prize, even when things get tough.

Want gumption? Below you’ll discover how to up your gumption quotient so that you can go after what you want in life.

Gumptionade

I already wrote about O’Connor and his book “Gumptionade” above. One of the strategies that O’Connor shares in his book for gaining gumption is to learn how to benefit from your mistakes.

It’s easy to refuse to acknowledge your mistakes, or to allow your mistakes to keep you down. But using your mistakes as a learning mechanism that will propel in the direction that you want to be moving takes gumption.

O’Connor explains that at the end of each day you need to review the day and ask yourself the following:

  • What mistake—big or small—did I make today?
  • I thought at the time it was the right thing to do because:
  • Now it seems to me that a more effective course of action would have been to:
  • The next time a situation like this comes up, I will do better by:

By constantly analyzing your mistakes and learning from them, you’ll be increasing your gumption.

A second strategy recommended by O’Connor is to acknowledge yourself when you do things well. People with gumption keep their spirits up by giving themselves kudos for all the good that they do.

Just as you review your day looking for any mistakes you may have made, think back and recognize what you did well. Here’s what to do:

  • Begin by creating a scale for your excellent deeds. As an illustration, you can give yourself one star for small, but noteworthy excellence; two stars for medium excellence; three stars for a lot of excellence; and four stars for jumbo excellence.
  • At the end of each day write down everything you did well that day, and rate each god deed depending on its degree of excellence.

Gumption helped O’Connor get his life back on track, and it can help you as well.

Beware of Gumption Traps

In Chapter 26 of “Zen and the Art of Motorcycle Maintenance”, Pirsig deals with the subject of gumption. He indicates that gumption is to a person what fuel is to a motorcycle. Here’s Pirsig:

“If you’re going to repair a motorcycle, an adequate supply of gumption is the first and most important tool. If you haven’t got that you might as well gather up all the other tools and put them away, because they won’t do you any good.

Gumption is the psychic gasoline that keeps the whole thing going. If you haven’t got it there’s no way the motorcycle can possibly be fixed. But if you have got it and know how to keep it there’s absolutely no way in this whole world that motorcycle can keep from getting fixed. It’s bound to happen. Therefore the thing that must be monitored at all times and preserved before anything else is the gumption.”

Of course, those two paragraphs above don’t apply just to repairing a motorcycle. They apply to any project you decide to take on. Pirsig goes on to say that there are many traps that you need to watch out for, because they will sap your gumption. He refers to these as gumption traps.

A gumption trap is anything that makes you lose your enthusiasm for a project. They can prevent you from getting started, or they can discourage you from continuing with a project before you’ve achieved your goal.

In addition, gumption traps can be internal or external. Pirsig refers to internal gumption traps as hang-ups, and he refers to the external ones as setbacks.

There are hundreds and maybe even thousands of gumption traps, so it’s impossible to name them all. However, whenever you feel like you’re losing the initiative to get to work on a project that’s important to you, or you feel drained of the motivation to keep going once you’ve gotten started, recognize that you’ve fallen into a gumption trap.

One example of a setback–or an external gumption trap–is when you take a motorcycle apart in order to repair it, and when you put it back together you notice that you left out some pieces. This means that you have to undo everything you did and start all over again. At this point, you’re likely to lose your enthusiasm for the project.

Another setback is when you don’t have the right information–maybe you can’t find a manual for your specific type of bike. Yet another example of a setback is when you don’t have the right tools for the job.

When it comes to hang-ups, or internal gumption traps, examples include anxiety and boredom. Here’s what Pîrsig has to say about each of these:

“Anxiety, the next gumption trap, is sort of the opposite of ego. You’re so sure you’ll do everything wrong you’re afraid to do anything at all. Often this, rather than ‘laziness’ is the real reason you find it hard to get started.”

“Boredom is the next gumption trap that comes to mind. This is the opposite of anxiety and commonly goes with ego problems. Boredom means you’re off the Quality track, you’re not seeing things freshly, you’ve lost your ‘beginner’s mind’ and your motorcycle is in great danger. Boredom means your gumption supply is low and must be replenished before anything else is done.”

If you’ve fallen into a gumption trap, you need to get yourself out. In the next section I’m going to share with you some of the ways I get myself out of gumption traps. Hopefully, these strategies will be useful for you as well.


Eight Ways to Get Yourself Out of Gumption Traps

Here are eight ways you can get yourself out of a gumption trap:

1. Increase Your Motivation. One of the reasons people lose their gumption is because they lose their motivation. Fortunately, there are many strategies you can use to raise your motivation when it starts to wane. The best of these is to remind yourself of all the reasons you have for wanting to achieve a goal.

Ask yourself questions like the following:

  • Why is achieving this goal important to me?
  • How will I benefit from attaining this?
  • Why was I originally so motivated to pursue this?

2. Become More Resourceful. When I think of resourcefulness, I think of the TV series, MacGyver. MacGyver was a secret agent who constantly found himself in life-or-death situations and would always save himself in the end by improvising with whatever everyday objects he had at hand.

Whenever you find yourself losing your gumption because of a lack of resources, get creative.  Do all of the following:

  • Engage in creative problem soloving;
  • Brainstorm alternatives;
  • Take a different perspective;
  • Leverage your network;
  • Be curious;
  • Be more playful; and so on.

3. Be Persistent. People with gumption don’t give up. They have grit and they persist. To increase your grit, develop active hope. That is, have hope that things will improve, because you’re going to improve them.

4. Increase Your Enthusiasm. Gumption is a high energy word. It’s full of spirit and enthusiasm. When you feel your enthusiasm draining out of you, visualize the end result that you’re pursuing. See it as clearly as you can in your mind’s eye, as if you’ve already achieved it. Then get up, and make it happen

5. Become More Courageous. Being courageous is almost synonymous with being gumtious. You’ve probably already read that courage isn’t the absence of fear. It’s learning to act despite feeling fear.

I recently came across a book titled “Do It Scared”. I’m planning to adopt that title as one of my mantras. People with gumption don’t wait for the fear to go away before they act. When they want to do something they do it, even if that means they have to do it scared.

6. Be Bold and Audacious. People who have gumption don’t sit around waiting for things to happen, and they don’t wait for others to take action. Instead, they boldy step forward and get to work on making things happen themselves. They have the audacity to think big, act big, and be big.

7. Fake It ‘Till You Make It. As Scott Young points out in the quote I included at the top of this blog post, you don’t need to wait until you have high levels of self-confidence to put yourself out there. Instead, fake it ‘till you make it. Put on your best “I can pretend to be confident as well as the best of them” face, get out there, and get your gumption on.

8. Increase Your Self-Efficacy. Self-efficacy is your belief that you have the ability to do what needs to be done. It’s hard to have gumption if you believe that you don’t have what it takes.

If you need some help in the self-efficacy department, remind yourself of all the times you’ve successfully tackled difficult goals in the past. Also, look for examples of people you can relate to who have succeeded in achieving the goal you’re trying to attain.

Conclusion

What would you do if you had more gumption? Use the techniques above to increase your gumption, and then get out there and do it. To live your best life, you need gumption.

Read Next: How to Be More Daring, Bold, and Audacious


banner make it happen

one hour a day header-2

guidebook of dreams banner how to be creative banner

Related Posts:

organized Christmas

Make this holiday season more joyous by having an organized Christmas.

In order to have an organized Christmas this year, start by creating a December Planner. Your planner will serve as your command central for both the month of December, and your holiday planning.

onehouradayformula banner longBy creating your own planner–instead of purchasing a generic one–you’ll be making sure that it’s tailored to your values and preferences. I created a December Planner for myself–in which Christmas is front and center–and I wanted to share it with you so that you can get ideas for your own plannner. Start by choosing a notebook or a binder. Then, proceed to create the pages that you’ll need in order to have an organized Christmas. Finally, embellish your December Planner your way, for a personalized touch (it can be elaborate, or very simple, it’s up to you).

Below you’ll discover the pages that I included in my December Planner. I hope that you’ll find it inspiring and will create your own.

Stylish Cover Page

Put yourself in the holiday spirit by creating a stylish cover for your December Planner. You can see my cover page in the image at the top of this blog post. I decided to use my planner to accomplish all of the following:

  • Be more productive this December;
  • Have a joyous and peaceful holiday season; and
  • Practice my newly acquired drawing/doodling skills.

Index

The first page of your December Planner, right after the cover, should be an index. The idea of adding an index to your planner comes from bullet journals. Having an index will help you to easily navigate your entries.

As you add new entries to your planner, give each entry a title and add the page number at the bottom. Then, turn to your index page and record that title and page number.

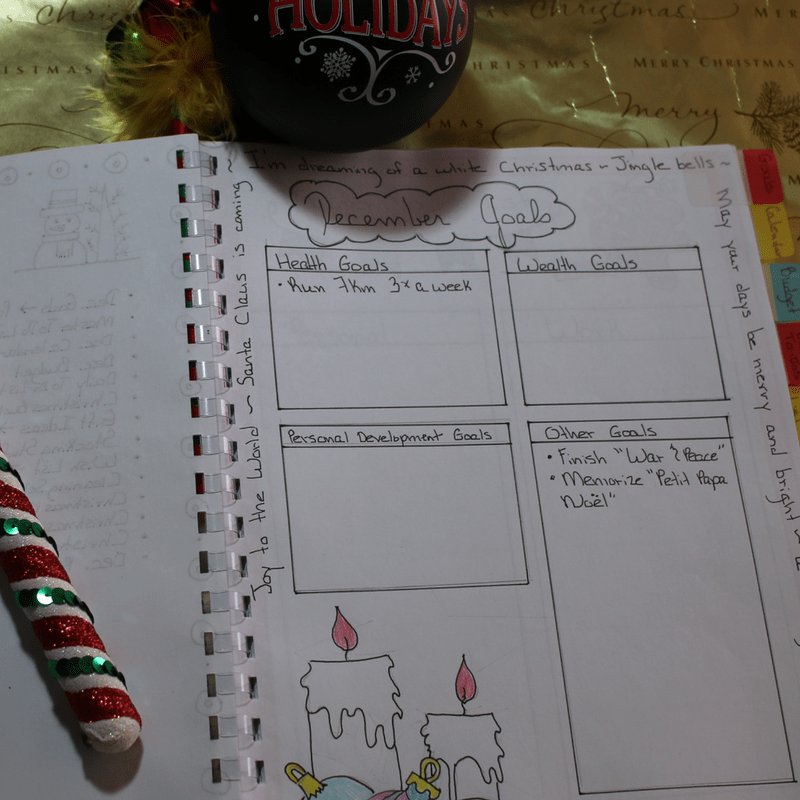
December Goals

You should set goals for every month of the year, and December should be no exception. Each month I set goals for the following life areas:

  • Health
  • Wealth
  • Personal Development
  • Other

For the month of December I have running and weight lifting goals; an earnings goal for my blog; and I want to finish my goal for 2017 of reading “War and Peace”. In addition, I have the following Christmas-related goals:

  • Memorize a Christmas carol in French (Petit Papa Noël).
  • Spend lots of time with my loved ones.
  • Stay in the holiday spirit constantly, even when things aren’t going my way or other people are being difficult.
  • Do something Christmas-related every day–even if it’s just having coffee in my Santa mug and making my coffee taste Christmassy by adding cinnamon and dunking a candy cane in it.

Here’s my page for December goals:

organized Christmas

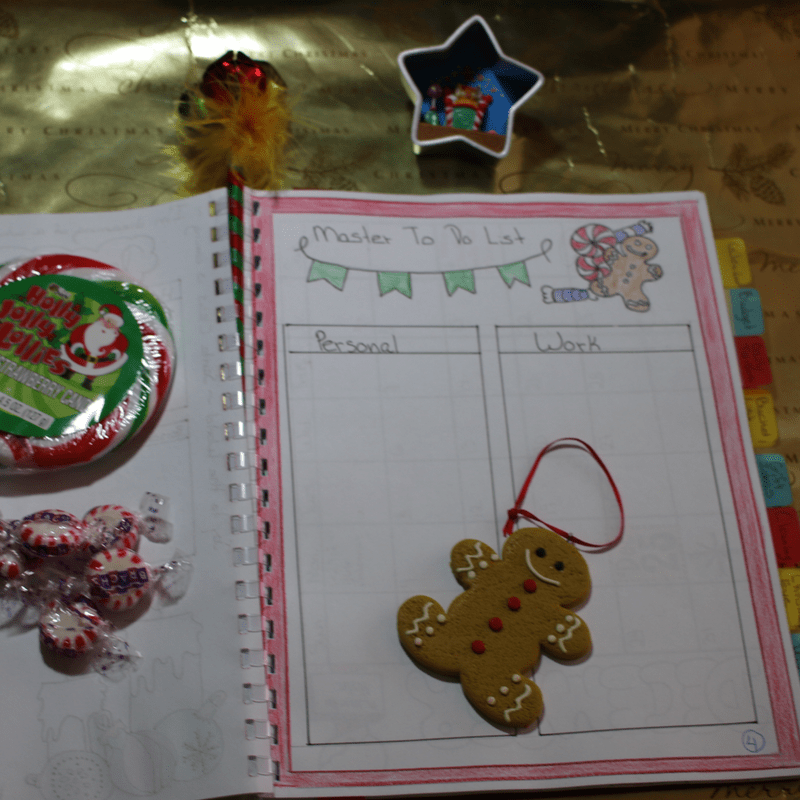
Master To Do List

Before December begins, do a brain dump and write down everything you need to get done in a Master To Do List. That will help you to create your daily to do lists so that you get to everything that needs to be done during the month of December, one day at a time.

My Master To Do List has two columns: one for personal stuff and one for work-related items.

organized Christmas

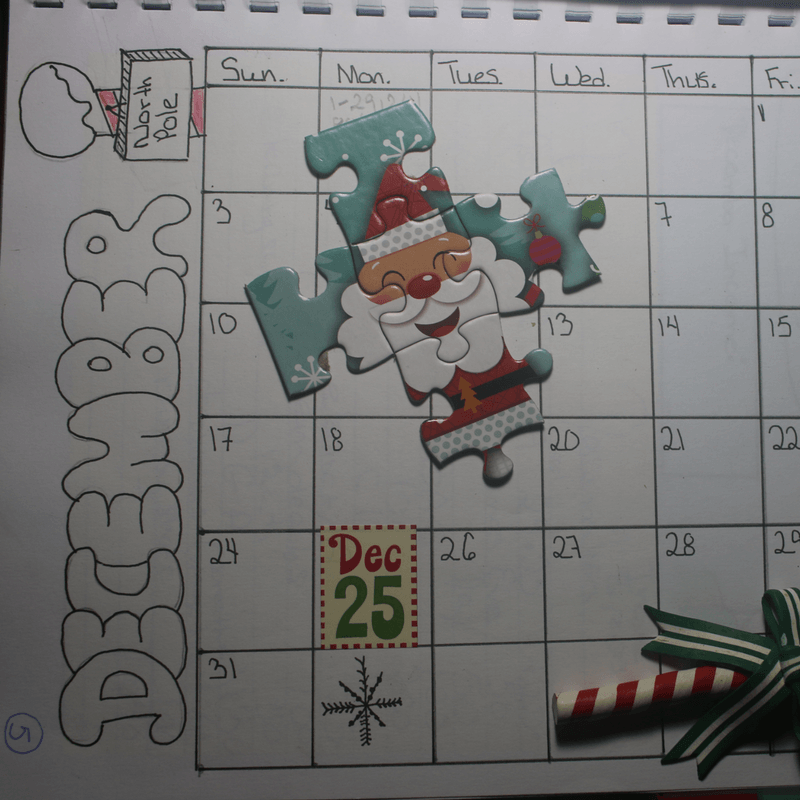
December Calendar

A December calendar is a must-have if you want to have an organized Christmas. A calendar will allow you to see the whole month at-a-glance so that you can get a bird’s eyeview of the entire month. You can also use the calendar to write down important events, such as the following:

  • The day in which the end of the year review is due at work;
  • The office Christmas party; and
  • The night all the neighbors are getting together for cocoa and caroling.
organized Christmas

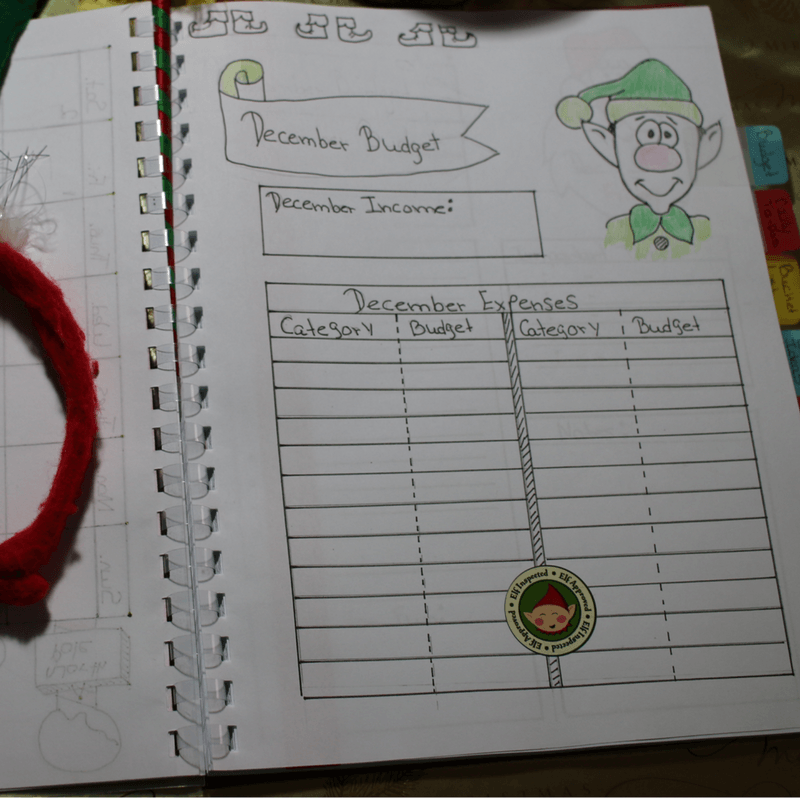
December Budget

Make sure that you stay on budget with your holiday spending. In addition to your regular monthly expenses, here are some additional expenses you need to take into account for the month of December:

  • Holiday gifts for your family members and loved ones.
  • Gifts for your employees and favorite service providers.
  • Gift wrapping supplies.
  • Charitable donations.
  • Christmas decorations and lighting.
  • Holiday meals.
  • Party supplies.
  • Travel expenses.
organized Christmas

Allocate your money wisely during the month of December by creating, and then following, a budget.

Daily To-Do List

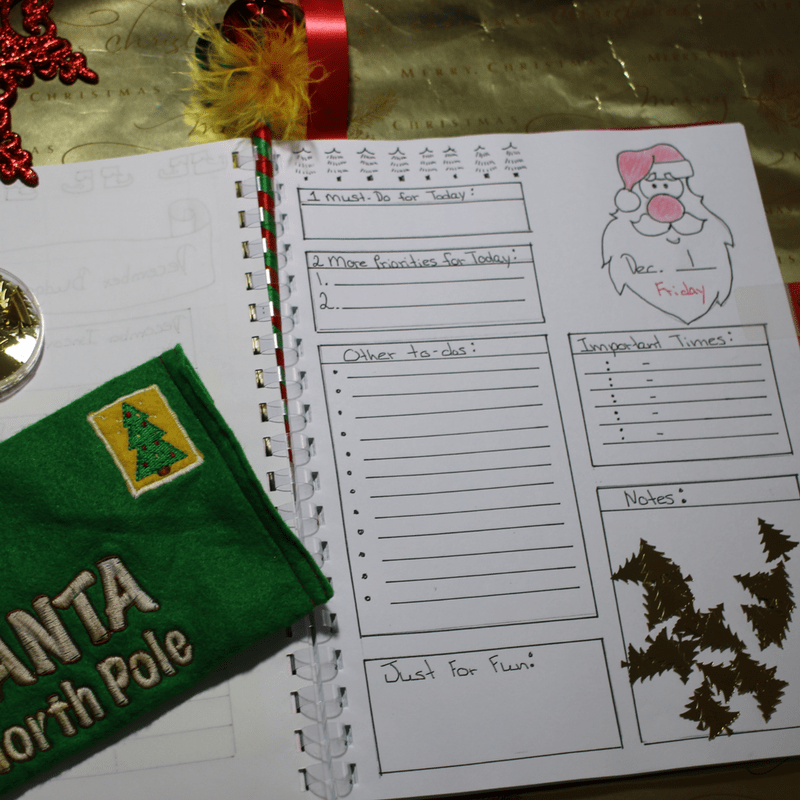
I’ve dedicated one page of my planner for every day of the month of December. Planning what you’ll be doing each day is key to having an organized Christmas.

Each daily to-do page of my planner contains the following:

  • 1 Must/Do For Today
  • 2 More Prioirities for the Day
  • Other To/Dos
  • Just for Fun
  • Important Times
  • Notes

Here’s what my daily to do list for the month of December looks like:

organized Christmas

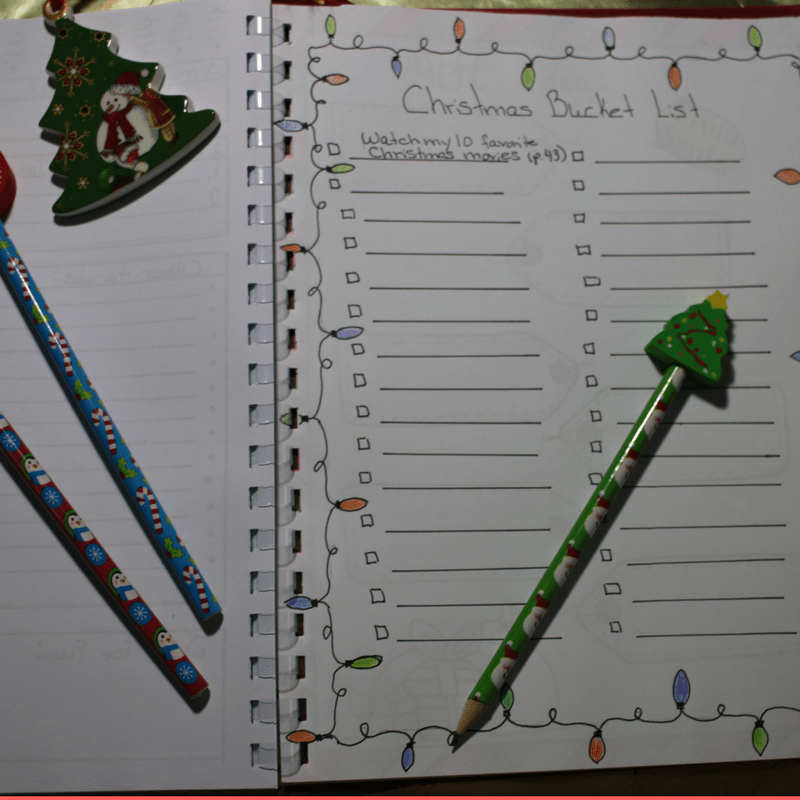
Christmas Bucket List

Having a Christmas Bucket List will help you to make the most of the season. Fill your bucket list with all of the fun Christmas activities you want to make sure to get around to this year, such as “Make a Playlist of Your Favorite Holiday Tunes”, or “Go to a Local Production of The Nutcracker”.

Look back at my daily to do list page for December, and notice that there’s a space titled “Just for Fun” at the bottom. When deciding what to include in that space, I’m simply going to refer to my Christmas Bucket List and pick and item from there.

Here’s the page for my Christmas Bucket List:

organized Christmas

Instead of a Christmas Bucket List you can create an inventory of your family’s favorite Christmas traditions.

You can get ideas for items to include in your Christmas Bucket List, or your Family Traditions spread, here:

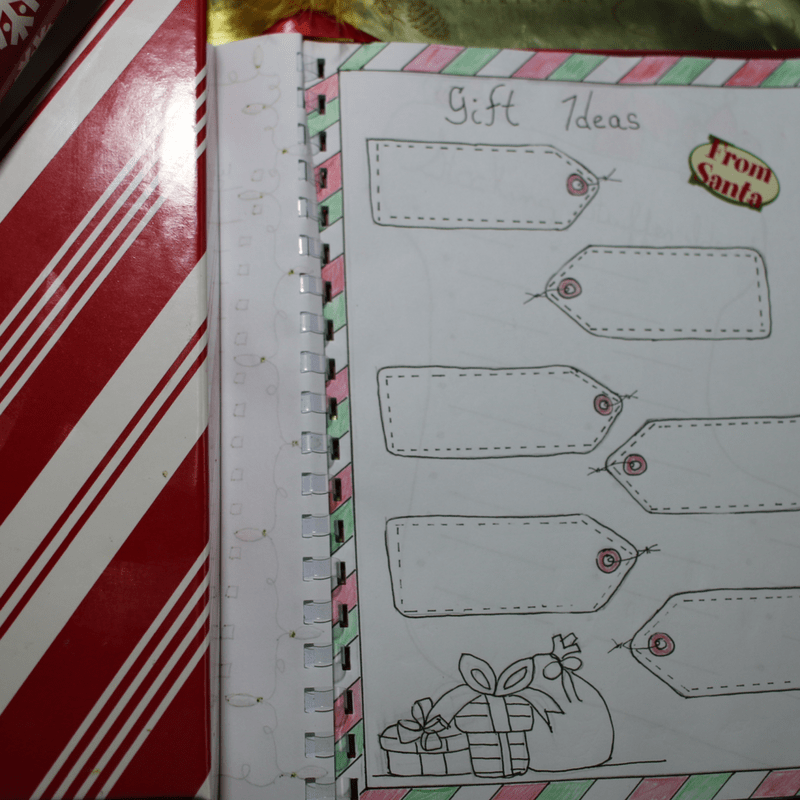
Gift Ideas

Gift giving is a big part of Christmas, although they don’t have to be store-bought gifts. You can give hand-made gifts, and you can even give the gift of time by offering people to babysit or help with chores.

One of the pages of my December/Christmas planner is dedicated to the gifts I want to give others this holiday season. Here’s what my page looks like:

organized Christmas

If you want to give your loved ones the gift of personal development, here are lots of great ideas: Holiday Gift Ideas for Self-Improvement Enthusiasts.

Stocking Stuffer Ideas

This year I’m organizing a small gathering for my immediate family, which will include Christmas games and making holiday crafts. I’m going to give my nephews and my niece a few small items for their stockings, so I created a page for my planner which I’m going to use to brainstorm stocking stuffer ideas.

Here’s the page:

organized Christmas

My Christmas Wish List

Christmas is about giving to others, but it’s OK to also think about yourself. I’m getting myself a couple of gifts this holiday season, so I’m creating a Christmas wish list. Also, it’s always good to be prepared for when people ask what you want them to give you as a Christmas present.

Here’s the format for my Christmas Wish List:

organized Christmas

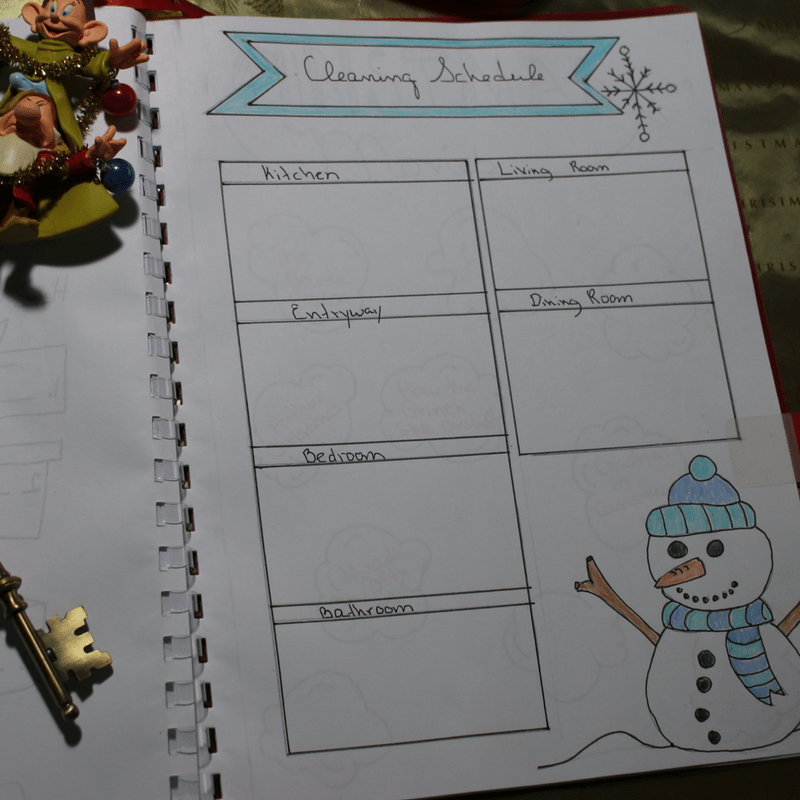
December Cleaning Schedule

For me, a cleaning schedule is a must in order to have an organized Christmas. Here’s the format for the December Cleaning Schedule I came up with:

organized Christmas

There’s a space for every area of my apartment, and I’m going to sit down and brainstorm the best way to tackle each area.


Christmas  Movies

Watching Christmas movies is one of the best ways to get into the holiday spirit. The first item on my Christmas Bucket List is watching my 10 favorite Christmas movies (I absolutely love Jim Carrey in “How the Grinch Stole Christmas” and “Elf”).

On this page of my December Planner I’m recording my 10 must-see Christmas movies. That adds detail to my bucket list, which makes it easier to achieve. Here’s my Christmas Movies page:

organized Christmas

You can choose to add a page to your planner for every item on your bucket list. For example, if one of the items on your Christmas Bucket List items is “Have a Gift Wrapping Party”, you can devote one page of your planner to planning out the details of the party. Add things like the following:

  • Guests.
  • Supplies (wrapping paper, gift bags, ribbon, scissors, tape, gift tags, and other embellishments to make the gifts more eye appealing).
  • Food and drinks.
  • Music.
  • Any additional activities you’ll be participating in, such as having a Christmas Cookie Exchange, or asking everyone to come wearing an Ugly Christmas sweater (so you can laugh at each others horrendous duds).

Christmas Eve and Christmas Day

Christmas Eve and Christmas morning are what all of the flurry of holiday activity leads up to. Therefore, I have a page of my December Planner dedicated to each. Here’s my Christmas Eve page:

organized Christmas

As you can see, I’m going to plan my Christmas Eve menu, and I’ve left a space for Christmas Eve activities. You may want to include space for planning out how you’ll decorate the table for your Christmas Eve Dinner.

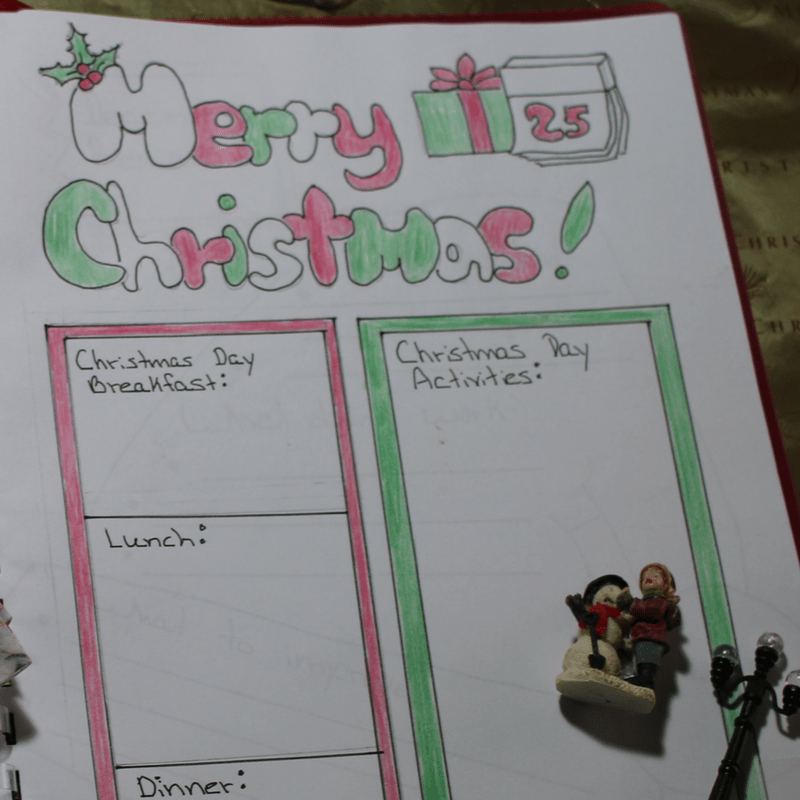
And below is my Christmas Day page. I have spaces for the following:

  • Christmas Day Breakfast; Lunch; and Dinner.
  • Christmas Day Activities
organized Christmas

December Review

At the end of each month you should review how the month went for the purpose of constant improvement. Here’s the page I’m going to use to review December:

organized Christmas

Other Pages for Your Planner

Of course, having an organized Christmas has a different meaning for everyone. As I said at the start of this post, your planner should be a reflection of what’s important to you. Here are some other pages you may want to incliude in your planner:

  • Family Holiday Recipes
  • Holiday Baking Planner
  • Travel Itinerary
  • Favorite Christmas Carols
  • Christmas Stories to Read
  • List of Christmas Cards To Send
  • Room-by-Room Holiday Decor Ideas
  • 24 Random Acts of Kindness Christmas Count-Down
  • Christmas Quotes

Make sure to leave some blank pages at the end of your December Planner so that you can add any additional pages you think of.

Conclusion

I hope that the December Planner I created for myself has inspired you to create your own, adapted to your own needs. Live your best life by having an organized Christmas.


banner make it happen

one hour a day header-2

guidebook of dreams banner how to be creative banner

Related Posts:
take control of your life

Although we live in a complicated world filled with uncertainty, there are things you can do to take control of your life.

The fact is that there are more things outside of your control than there are within your control. This knowledge can cause a myriad of negative feelings, such as anxiety, fear, and even helplessness. After all, it can be unsettling to realize just how much of life is uncertain and uncontrollable.

Here are just some examples of things that you can’t control:

onehouradayformula banner long
  • What anyone around you does (not even the people closest to you).
  • The economy.
  • The weather, including natural disasters.
  • World events, or what politicians do.
  • The traffic.
  • The stock market or interest rates.
  • Inflation.
  • The fact that you may have inherited a predisposition to certain diseases and illnesses (both physical and mental).

And the list goes on and on.

However, there are things you can do to better manage the fact that there is so much over which you have little or no control. Below you’ll find 10 tips that will allow you to take control of your life in an uncertain world.

Step 1. Set Goals

Take control of your life by setting goals. Setting goals will do all of the following for you:

  • Allow you to clarify what you want in life.
  • Provide a target for you to shoot at.
  • Allow you to create a life governed–as much as possible–by your own choices.

Think of it this way: although there are many things outside of your control, there are some things within your circle of influence. This includes your assets and resources, such as your time, money, attention, and so on.

Setting goals is a mechanism that will allow you to manage those things that are within your control in a way that will allow you to create the kind of life you want, even in an uncertain world.

2. Practice Prevention

You can reduce some of the uncertainty in your life–and put more of what happens to you within your control—by practicing prevention. Prevention, in a nutshell, is putting up safeguards that will reduce the probability that something that you don’t want to happen will take place.

Here are some examples:

  • You don’t want to get sick, so you eat healthy meals most of the time, and get regular exercise. This doesn’t guarantee that you won’t get sick, but it does reduce your risk of contracting certain diseases.
  • You don’t want your car to break down in the middle of the road, so you take it in for regular tune ups. This doesn’t guarantee that your car won’t break down in the middle of the road, but it does lessen the probability that this will happen.
  • You don’t want a thief to break into your house, so you put bars on your windows. This doesn’t provide 100% assurance that a thief won’t break into your house, but it is a hindrance that makes it less likely that your house will be robbed.

Take control of your life by taking steps that will lessen the probablity that bad things will happen to you.

At the same time, don’t take action that will make it more likely that the things you don’t want to happen will take place. Here are some examples:

  • If you don’t want to get lung cancer, don’t smoke.
  • If you don’t want to be in a car accident, don’t speed, and don’t talk on your phone while driving.
  • If you don’t want to get mugged, don’t walk alone at night in the bad part of town.

You can take control of your life by thinking of the things that you don’t want to happen, and then acting in a way that makes it less likely that those things will happen.

3. Be Prepared for the Unexpected

There’s a 1785 poem by the Scottish poet Robert Burns titled, “To a Mouse”, which contains the following phrase: “The best laid plans of mice and men, often go awry”.  Even if you’ve come up with a great plan for getting to where you want to go, things can still go wrong. However, all is not lost. . . if you’re prepared.

You can take steps ahead of time to be prepared in case something unwanted takes place. That is, you can take control of your life by preparing for the unexpected.

As an illustration, a few months ago my laptop died, out of the blue. I didn’t do anything to it—like dropping it or getting it wet—, it just. . . died, without warning. I make a living online, so not having a computer is a really bad thing for me.

Nonetheless, because I know that computers tend to malfunction, and simply stop working at the most inconvenient moments, I was prepared. I had an envelope stashed away with money inside for this exact eventuality.

Therefore—after being told by the computer repair guy that there was no way to salvage my laptop–, instead of panicking, I simply did the following:

  • I grabbed my envelope;
  • I headed on over to the mall; and
  • I bought myself a new laptop.

The crisis was averted, and I was able to quickly restore order to my world, because I was prepared.

Here are some other ways to prepare for the unexpected:

  • Take out insurance.
  • Give yourself a time cushion for important events: leave early for important meetings; include time to deal with unexpected events when you calculate how long an important project will take to complete; and so on.
  • Keep an extra shirt at work in case you spill something on yourself.
  • Always keep a spare tire—in good condition–, along with a tire jack and tire iron, in the trunk of your car.
  • Build a stash of anything that’s important to your wellbeing.
  • Create safety net containing six months’ worth of living expenses.
  • Keep a fire extinguisher in your home, and have a home fire escape plan.

Being prepared allows you to regain control quickly and effectively if something goes wrong. It allows you to retake control of your life after something unexpected has taken place.

4. Practice Acceptance

Anytime your plans are thwarted, practice acceptance. Acceptance is perceiving an experience and acknowledging it, without judgement or resistance. After all, judging or resisting an event or situation won’t change it, and it won’t help you to deal with it. It will simply cause you suffering.

At the same time, acceptance doesn’t mean resignation. Once you’ve accepted something, you’re no longer wasting your time and energy negating it, or fighting against it. Instead, you’ve put yourself in the best possible position to begin planning your next move, so you can begin to influence the event or situation.

Take control of your life by practicing acceptance.

5. Choose Your Story Carefully

More and more I’ve come to realize the importance of the stories that we tell ourselves about what’s going on around us. After all, what happens in the outside world isn’t really what matters. Instead, what matters is what we choose to tell ourselves about what happened.

Once an unexpected event has taken place, and you’ve accepted what happened, the next step is to be careful with the story that choose to tell yourself about what took place. This is important because the story you tell yourself can either empower you, or disempower you.

Make sure that the story you tell yourself is in line with the facts, and that it does the following:

  • Keeps you in the driver’s seat—don’t tell yourself a victim story.
  • Allows you to acknowledge any mistakes you made so that you can learn from those mistakes.
  • Give you options to move forward.

Also, take control of your life by keeping in mind that just because things veered off course, that doesn’t mean the story is over. The story can still have a happy ending, depending on what you choose to do next.

6. Choose Your Attitude

I wrote in the previous point that when something unexpected happens, you should be careful with the story that you choose to tell yourself about what happened. In addition to the story that you tell yourself, something else that’s under your control is the attitude that you choose to have.

Ask yourself:

  • What do I want to happen here?
  • What attitude would be the most helpful in helping me to achieve what I want?

Then, choose that attitude. Take control of your life by always choosing the attitude that is most likely to help you create the kind of life that you want.

7. Come Up With a Different Plan

When something doesn’t go as planned, simply assess the situation, and then come up with a different plan. That is, adapt.

Even when the things that you thought would happen don’t happen, there are steps you can take to influence what happens next. Start generating alternatives, evaluate those alternatives, pick one, and get to work on carrying it out.

8. Stop Waiting For Other People

A lot of the time things feel out of control because of other people. They act in ways you disagree with, or they fail to do the things you feel should be done. The bottom line is that there’s nothing you can do to control other people. But you can always control yourself.

To take control of your life, take back the decision-making power when the action or inaction of others is making you feel helpless, angry, or frustrated. As an illustration, suppose that you want to move up the ladder at work. You do everything you can to turn yourself into the ideal employee:

  • You perform your duties well, and even go above and beyond what’s expected of you.
  • You devote one-hour-a-day to keep your job skills updated.
  • You anticipate your boss’s needs and make him look good to the higher ups.

Nonetheless, you’ve been stuck in the same position for a long time, and you’ve finally realized that this isn’t going to change. That’s when you decide to stop waiting for your boss to offer you a promotion, and you take things into your own hands.

Here are some of the things you can do:

  • Try to move up by asking for a transfer to a different department of your company where you’ll have a better boss or more opportunities.
  • Start applying for a better position at another company.
  • Start a side business and begin preparing to quit your job as soon as your business starts doing well.

Here are some more examples of how you can take control by taking the decision out of the hands of others:

  • Stop waiting for someone to publish your book. Instead, self-publish it.
  • Stop waiting for your city’s government to clean up the beach. Grab some trash bags and some friends, and start cleaning it yourself.
  • Stop waiting for a business school to accept you. Read the best business books you can find and start applying what you learn from those books.

The more decisions you take out of the hands of others, and put into your own hands, the more control you’ll have over what happens next.

9. Make a List of Things You Can Control

Even if there’s absolutely nothing you can do about a specific situation—at least in the present moment—there are many things in your life that are still within your control. Focusing on what is within your control will help to restore a sense of order in your life.

Place your attention on those things that are within your control by making a list of those things.  Here are some examples of things that you can put on your list:

  • Cook yourself a healthy, delicious meal.
  • Choose to be kind to yourself and practice self-care.
  • Practice a hobby you’re good at, such as playing the piano, drawing, or doing some woodwork. You can also practice a sport you enjoy.
  • Declutter and organize your closet. Donate the stuff that is still wearable, but that you no longer use, to Goodwill.

Focusing on things you can control will allow you to restore a sense of your own self-efficacy, which is often eroded when you feel as if you have little say in what happens to you.

10. Reduce Your Anxiety With Positive Self-Talk

One of the feelings that often accompany an event that makes you feel as if things are out of your control is anxiety. When I begin to feel anxious because something isn’t going as planned—despite my best efforts—I lessen the anxiety that I feel by repeating some positive affirmations to myself.

Here are the affirmations I use:

take control of your life

Conclusion

Apply the 10 tips above and take control of your life. Live your best life by dealing effectively with a world filled with uncertainty.


banner make it happen

one hour a day header-2

guidebook of dreams banner how to be creative banner

Related Posts:
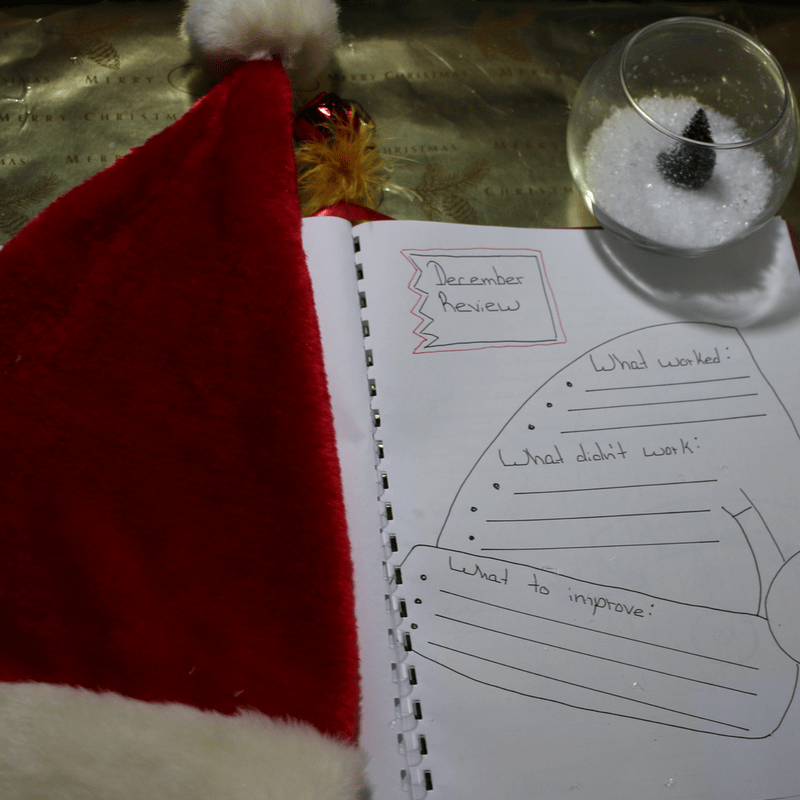
make your life more meaningful

Strive to lead a meaningful life.

Much has been said lately about the pursuit of happiness. But what about the pursuit of meaning? It turns out that pursuing meaning may have more of an impact on long-term life satisfaction than pursuing happiness.

If you make your life more meaningful, you’ll enjoy all of the following benefits:

onehouradayformula banner long
  • Having meaning in your life will make you healthier.
  • It will fill you with energy and vitality.
  • You’ll be better able to cope with adversity.
  • It will make you more productive.
  • Your life satisfaction will increase.
  • You’ll receive a self-confidence boost and feel better about who you are.
  • It will increase your ability to achieve the flow state – that state in which time seems to stand still and you feel “at one” with what you’re doing.
  • If your life feels meaningful to you this will allow you to satisfy your human need for value.
  • People who believe that their lives have meaning live longer than those who don’t.

So, what is a meaningful life? According to a paper published in 2016 in the Review of General Psychology, a meaningful life contains three features:

  • Purpose – having and trying to achieve life goals which you consider to be important and of significance.
  • Comprehension – Making sense of the events that have taken place in your life and noticing how they weave into a coherent whole.
  • Mattering – the belief that your existence is valuable.

That is, a meaningful life has purpose, coherence, and significance. Below you’ll find 9 ways to make your life more meaningful.

1. Make Your Life More Meaningful By Having a Purpose

As you can see from the three features of a meaningful life that I listed in this post’s introduction, you should strive to live a life on purpose. Emily Esfahani Smith, author of The Power of Meaning: Finding Fulfillment in a World Obsessed with Happiness, explains that to find your purpose you should do the following:

  • Begin by identifying your strengths.
  • Then, look for ways to use your strengths in a way that will serve and benefit others.

People with a meaningful life can answer this question: “What’s your purpose?” If you currently feel that you don’t have a purpose, get to work on finding one. Your life will immediately become more meaningful.

2. Reframe How You See Your Job/Occupation

In the Massive Open Online Course, “Science of Success: What Researchers Know that You Should Know“, Paula J. Caproni, Ph.D., explains that getting results at work isn’t enough. She adds that the years that you spend working will be much better spent if you believe that the work that you do matters.

Caproni indicates that researchers have found that when we’re engaged in what we believe to be meaningful work, all of the following happens:

  • We take greater pride in our work.
  • We feel more responsibility for work outcomes.
  • We are better able to handle stress.
  • We’re more likely to stay motivated.

If you currently don’t find your job meaningful, then look for ways to reframe how you see your job or occupation. Think of the well-known story of the NASA janitor. In 1962, then-President John F. Kennedy was visiting the NASA Space Center. He noticed a janitor sweeping the hallway and asked him, “What are you doing?”

The janitor responded as follows: “Well, Mr. President, I’m helping to put a man on the moon.” He wasn’t just cleaning, or earning a paycheck. Instead, this janitor saw himself as someone who was playing a role in the grand vision of sending a man to the moon.

I remember when I worked for the Panama Canal Authority (PCA)—the agency that began running the canal after the US transferred it to Panama in the year 2000—I felt that I was doing something meaningful. This is how I framed my job at the PCA:

  • I was helping to prove that Panamanians could run the canal as well as, or even better than, the US could.
  • In addition, I was helping to take care of Panama’s patrimony for future generations.

Stop for a moment and think of your current job or occupation. Then, ask yourself how you can think of it in a way that will make you feel that what you’re doing has meaning.

3. Choose Your Friends Wisely

Of course, our sense of self-worth should come from ourselves. However, human beings are social creatures, and how we feel about ourselves is often impacted by the way in which others treat us. Therefore, to make your life more meaningful, look to surround yourself with people who make you feel that you matter.

Cultivate relationships with those who value who you are.

4. Find a Balance Between Seeking Happiness and Meaning

A lot of the time it seems as if there’s a trade-off between seeking happiness and seeking meaning. After all, happiness often involves doing things that make you feel good in the moment. For example, going dancing; getting a massage; or buying yourself a new tech gadget.

On the other hand, meaningful activities usually involve making sacrifices. Some examples include the following: carrying boxes all weekend as you help your friend to move; studying hard to become a doctor; or saving to be able to pay for an important goal.

Notice that meaningful activities often involve effort and toil. However, meaning allows us to transcend those moments of hardship because we know that we’re pursuing something bigger:

  • Strengthening our friendships;
  • Gaining the ability to save lives; or
  • Savoring the satisfaction of achieving an important goal.

A life that is only about pursuing hedonic happiness is ultimately an unfulfilling life. At the same time, a life that is solely about pursuing meaning—while neglecting the present moment—can be an unnecessarily austere life.

The key is to find that sweet spot between enjoying the present moment—which is often described as happiness–, and pushing on to achieve an important goal, in spite of the discomfort that it may entail, which is meaning.


5. Choose Integrity

As I was doing the research to write this post, I came across the following framework for finding purpose and meaning:

make your life more meaningful

Ideally, you should look for ways to live your life in Quadrant II, in which you’re happy and you’re living with integrity. Quadrant III is basically hell: you’re miserable and you’re living without integrity. Obviously, you should try to avoid this quadrant at all costs.

Where it gets tricky is when you have to choose between Quadrants I and IV.

  • Do you choose integrity even if it means living a difficult life?
  • Do you choose to lose your integrity in exchange for ease and comfort?

If you want to live a meaningful life, you would choose Quadrant I: living with integrity, even if this has negative consequences for you. An example of this is the Australian Olympic athlete, Peter Norman.

During the 1968 Olympic games, Norman stood in solidarity with the black athletes Tommie Smith and John Carlos when they raised gloved fists during the medal ceremony for the track event to protest inequality. This black power salute rocked the world. Back in Australia, Norman was shunned for his part in the protest.

Norman acted with integrity, although he almost certainly knew what it would cost him. He believed that inequality was wrong, and he played a role in fighting against it, although this made his life more difficult. His life wasn’t easy, but it had meaning.

6. Write Your Life’s Story

Make your life more meaningful by writing down your life’s story. Emily Esfahani Smith —who has already been mentioned above—explains that making a narrative of your life provides clarity.

It offers a framework that goes beyond the day-to-day and allows you to see how different events in your life are contributing to the whole. This will help you to make sense of yourself and of your life.

In addition, creating your life’s story will give you an opportunity to retell your stories in more positive ways. Clearly, you’re constrained by facts, but you can edit your stories and reframe them, so that you can start telling a better story of what your life is about.

Three good themes for your life’s story are the following: redemption, love, and growth.

7. Express Yourself

There’s a lot of people out there pretending to be someone they’re not. After all, the pressure to fit in and to conform is very strong. However, if you’re not allowing yourself to be who you are, then you can’t truly live a meaningful life.

Think of the goals that you’re currently pursuing. Do your goals “sound like you”? Do they reflect your personality? Are they in line with your values? If not, then you need different goals. You can make your life more meaningful by striving to achieve goals that allow you to express who you are.

8. Make a Difference In Small Ways

You don’t have to have a job that involves saving lives, and you don’t have to do something incredibly heroic, in order to have a meaningful life. You can help to make this world a better place–thereby making your life meaningful–in small ways.

Perhaps at the end of your life you won’t be able to say: “I did this one huge, impactful thing that helped others”. But it’s just as noble to be able to say: “I took thousands of tiny actions that made life a little better for others.”

If you want some ideas on how to get started, read my post “25 Small Ways to Change the World”.

9. Think of Your Legacy

Someday, as you lay dying, it will be of great comfort to you to know that you’re leaving a meaningful legacy behind. Sit down and ask yourself what your legacy will be when you’re gone.

If you’re not happy with what your legacy would be if you died tomorrow, get to work on creating a meaningful legacy now. You can get ideas on how to get started by reading my post, How to Leave a Lasting Legacy. Make your life more meaningful by working on your legacy.

Conclusion

You can begin reaping all the benefits of leading a meaningful life by applying the 9 tips above. Live your best life by making it a life full of meaning.


banner make it happen

one hour a day header-2

guidebook of dreams banner how to be creative banner

Related Posts:

learn to draw in 30 days

Drawing is a skill anyone can learn.

November is National Novel Writing Month– or NaNoWriMo. In case you’ve never heard of NaNoWriMo, it’s a challenge to write a 50,000 word novel in 30 days. The idea is that, by setting aside some time to write a little each day, in one month you’ll have written an entire novel.

For those of you who wish to be creative during the month of November, but have no interest in writing a novel, here’s another creative challenge you can take during the month of November. The challenge is learning to draw in 30 days.

onehouradayformula banner longWhen I was in elementary school, we had art class. However, the art teacher would simply place the art supplies in the middle of the table at the start of class and tell us “to draw”. That’s it: she never gave us any instructions on how to do it.

Therefore, I never learned to draw. In addition, I was under the impression that drawing was a talent which I simply didn’t possess. That is, until I started doing research on how to learn new skills and realized that anything can be learned–if the right approach is used.

I’m currently working on a video course called “Learn Skills Fast”. One of the skills that I taught myself by following the method that I came up with is drawing. This post is roughly based on the process that I followed in order to learn to draw.

The first thing that I did was identify the three primary resources that I would use. These are the following:

However, my learning methodology involves taking charge of your own learning experience, and using several resources in order to make sure that you’re learning in the way that is best suited to you and your needs. Therefore, you’ll see me referencing other sources—in addition to the three books mentioned above—throughout this post.

Resolve to set aside one-hour-a-day throughout the month of November to learn to draw–with graphite pencils–and then follow along with this post. Below you’ll discover how to learn to draw in 30 days.

Day 1 of the Learn to Draw in 30 Days Challenge –  The Sphere

Kistler indicates that to start drawing all you need is a regular No. 2 pencil with an eraser, and a sketch pad. I got a 30-page sketch pad at the pharmacy for $1.99. You probably already have a No. 2 pencil, so go out and get a sketch pad. With a tiny investment, you’re ready to get started.

Start by drawing an airplane, a donut, and a house so you can measure your progress. Take ten minutes right now and do this (it’s OK if it’s terrible, you’re learning how to draw).

The first thing that most drawing tutorials teach you to draw is shapes, starting with a sphere. After all, any object that you see around you can be constructed by using one, or  a combination of, three different shapes:

  • A circle – a sphere is a circle in 3D.
  • A square – a cube is a square in 3D.
  • A triangle – a cone is a triangle in 3D.

In addition, there are two more 3D forms:

  • A pyramid, which is a variation of the cube.
  • A cylinder, which is a variation of the cone.

Look at the following illustration by Edward A Burke:

These shapes and forms help us to simplify the complex information in front of us. A useful drawing strategy is to work from the largest, most general shapes, to the smallest and most specific.

We’re going to learn to draw the shapes and forms in the image above, one at a time, starting with the sphere. As was stated above, a sphere is a circle in 3-D.  The way in which you turn a circle into a sphere is with shading and shadow.

Here is a video of Kistler’s lesson on how to draw a sphere (don’t just watch the video–follow along and draw a sphere): Day 1 of Learning to Draw in 30 Days.

Day 2 of the Learn to Draw in 30 Days Challenge  – Value

“Value”–also referred to as “tone”–is simply how dark or light something is. It’s used in drawing to depict light and shadow to create a three dimensional illusion. Kistler provides very vague instructions on shading and shadowing, so I did additional research on this.

The first step in understanding value is to create a value scale. Value scales run from black to white, with several different shades of gray in between. You’re going to start out by creating a value scale with five squares. The first square is going to be black, and the last square is going be white. The other three squares will be gray, as follows:

  • Dark gray.
  • Middle gray.
  • Light gray.

It should look like this:

You can create your value scale in any of three ways:

  • Press down harder on the pencil for the dark colors.
  • Use more layering for the darker colors.
  • Use pencils of different grades.

What you think of as a “lead pencil” isn’t made of lead at all. Instead, these pencils are made of a mixture of clay and graphite. This core of clay and graphite is referred to as the pencil “lead”. The pencil lead is placed between wooden halves, which are glued together.

Manufacturers alter how soft or how hard a pencil is by changing the amounts of clay and graphite that they use in the lead. Hard pencils (H) have a lighter value because they leave less graphite on the paper. On the other hand, soft pencils (B) have a darker value because they leave more graphite on the paper.

Graphite pencils range fron 9B (the softest and darkest), to 9H (the hardest and lightest). The full range of drawing pencil grades looks like this:

9H, 8H, 7H, 6H, 5H, 4H, 3H, 2H, H, HB, F, B, 2B, 3B, 4B, 5B, 6B, 7B, 8B, 9B

However, you don’t need the whole range of graphite pencils. I have a set of Staedtler Mars Lumograph pencils which range from 6H to 6B.

However, once again, you don’t need to go out and buy pencils at this point. If you prefer, you can stick to your normal Nº 2 pencil (which roughly corresponds to HB in the scale above) and press down harder, or add more layers, to get the darker tones. Press down softer to get the lighter tones.

Take a look at the value scale you created. When you draw a sphere, you’re going to use these five different tones. Look at the following:

  • The darkest tone is going to be the cast shadow.
  • The dark gray is going to be the core shadow.
  • The middle gray is going to be the midtone.
  • The light gray is going to be the reflected highlight.
  • The white is going to be the highlight.

Now, draw a sphere with proper shading and shadowing by following along with this video: How to Draw a Sphere.

Day 3 of the Learn to Draw in 30 Days Challenge –  Objects Shaped Like a Sphere

The reason you want to learn to draw a sphere is so that you can draw objects that have a spherical shape. One such object is an apple. To further grasp–and practice–the concepts of shading and shadows, draw an apple in 3D by following along with the tutorial below.

The Basics of Highlights, Midtones, and Shadows

Look around and notice all of the sphere-shaped objects that surround you. You’ve taken the first step to be able to draw those objects.

Day 4 of the Learn to Draw in 30 Days Challenge –  The Cube

As was stated in Day 1, the cube is one of the fundamental shapes/forms you should learn to draw. As you’ll discover in Days 5 and 6, once you know how to draw a cube you’ll be able to draw many different things, including houses. Learn to drawa cubes by following along with Kistler in this video: The Cube.

Day 5 of the Learn to Draw in 30 Days Challenge –  Advanced Cubes

Now that you can draw a cube, you can draw hollow cubes–like boxes or chests–, and you can draw all sorts of cube-shaped things. Start off by following along with Kistler in the three videos below:

In addition, once you can draw cubes, you can also draw all sorts of cube-shaped ojects. Practice by drawing a printer by following along with this video: Drawing Box Shaped Things.

Day 6 of the Learn to Draw in 30 Days Challenge –  Draw a House

Most houses are shaped like cubes. So, once you know how to draw cubes and advanced cubes, you can draw a  house. Start off by drawing this simple house (turned into a milk carton): Constructing With Cubes.

Then, move on to this more complex house: Advanced-Level House.

Day 7 of the Learn to Draw in 30 Days Challenge –  Draw Cylinders

The next fundamental shape that you’re going to learn to draw is the cylinder. Again, there are many objects and things all around you that are shaped like cylinders, including bottles, candles, lipsticks, and so on.

Draw a cylinder with Kistler by following along with this video: The Cylinder.

Once you can draw a cylinder, draw an object shaped like a cylinder. How about a can? It can be a soup can, a can of beans, a soda can, and so on. Follow along with this video: Draw a Can of Coke.

Look around and count how many cylinder-shaped objects you can find. You’re well on your way to being able to draw them.

Day 8 of the Learn to Draw in 30 Days Challenge –  Draw a Pyramid

The next fundamental shape/form that you’re going to learn to draw is the pyramid. The roof of most people houses are pyramind shaped. In addition, blocks of cheese, perfume bottles, and paper weights can be shaped like pyramids.

Follow along with this video and draw a pyramid: How to Draw a Pyramid.

Day 9 of the Learn to Draw in 30 Days Challenge –  Draw a Cone

Cones are another shape that show up all over the place. Learn to draw cones by reading the instructions in the article below.

How to Draw a Cone

Once you’ve learned how to draw a cone, draw an ice cream cone. Follow along with this video: How to Draw a Cartoon Ice Cream Cone.

Day 10 of the Learn to Draw in 30 Days Challenge –  Shade Basic Forms

You already learned how to shade a sphere. Here’s how to shade all of the basic forms you’ve learned how to draw: How to Shade Basic Forms.

Day 11 of the Learn to Draw in 30 Days Challenge –  Structure Basics

Once again, the reason that you’re learning to draw geometric shapes is because anything that you may want to draw is made up of one or more geometrtic shapes. You have to learn to notice the shapes in the objects around you, and draw them.

Now that you know how to draw the basic geometric shapes, here’s a great video on how to use those shapes and put them together to create great drawings: Structure Basics – Making Things Look 3D.

Then, use the shapes that you’ve learned to draw and draw this lamp: Draw Anything Using the Four Basic Shapes.

Day 12 of the Learn to Draw in 30 Days Challenge –  Overlapping Objects

The challenge in drawing is taking a three-dimentional object from real life and creating a realistic representation of it on a piece of paper, which is a two-dimentional surface. In other words, you have to find a way to create the illusion of depth, space, and distance. There are several “tricks” that artists use to achieve this.

So far, we’ve covered one way to create the illusion of depth: shading and shadows. Here are six more ways to create the illusion of depth:

One. Varying Sizes – Objects are drawn larger in the foreground and smaller the farther back you want them to appear.

Two. Placement – The objects that are drawn lower down on the page appear to be closer to you than the objects that are drawn higher up.

Three. Color and Value – Items that are closer to you appear darker than the objects that are farther away. If color is used, items that are closer appear to be warmer in color.

Four. Detail – Objects that are closer contain more details than objects that are farther away.

Five. Linear Perspective – By using one, two, or three-point perspective, artists can make objects appear closer or father away.

Six. Overlapping – Overlapping is placing one object in front of another. The object that is in front seems to be closer than the object that is behind.  In addition, objects with interrupted edges appear to be further away than those with complete contours.

Today we’re going to take a look at the sixth way to create the illusion of depth: overlapping. The next video you’re going to take a look at has Kistler demostrating how to draw lilies. However, he goes further that that. He  draws three lilies that overlap.

Follow along with this video and draw overlapping lilies: Lovely Lilies.

Notice that Kistler drew the lily in front first, and then he added the two in the back. In the book The Fundamentals of Drawing: A comprehensive drawing course for the beginning artist, Tom Dowdalls recommends that you begin with a quick sketch of the objects that are farther back, and then draw the ones that are in front. Try both ways and notice which one works best for you.

Day 13 of the Learn to Draw in 30 Days Challenge –  Draw Ellipses

An ellipse is simply an elongated–or a foreshortened–circle. You’ve already drawn ellipses since a cylinder is basically two ellipses connected by two perpendicular vertical lines. However, due to the importance of the ellipse, here’s a video that explains how to draw this shape: Drawing Ellipses.

And here’s some more guidance on how to draw using ellipses: Drawing An Ellipse Step-by-Step.

Now, draw this vase using ellipses: Ellipse Perspective.

Day 14 of the Learn to Draw in 30 Days Challenge –  Curves

Curves are found all over the place, so it’s important to learn how to draw them. You’ve already drawn lillies, so you already know how to draw curves. Get better at drawing curves by drawing flags, scrolls, and roses.

Follow along with Kistler in this video: How to Draw a Rose With Mark Kistler.

Day 15 of the Learn to Draw in 30 Days Challenge –  Cross Contour Lines

A contour is a line which defines the outline of an object. It’s a depiction of the outer edges of the object that you’re drawing, without adding any additional details. Cross-counter lines are lines that reflect the movement of your eyes around the objects that you see.

Cross-contour lines can be horizontal or vertical. They help us to described the form, and its shape, more accurately by varying the thickness of our lines or shading along the cross-contour lines.

Cross-contour lines will improve your drawing by making them more three dimensional and by communicating form. Watch the three videos below for an excellent explanation of of cross-contour lines.

Then, draw an apple using cross-contour lines by following along with this video: Drawing An Apple With Cross-Contour Lines.

Day 16 of the Learn to Draw in 30 Days Challenge –  Draw A Tree

Draw a tree with a realistic-looking trunk, branches, and foliage by following along with this video: How to Draw a Tree with Mark Kistler. Then, get even better at drawing trees by drawing another tree. Follow along with this video: Draw a Tree With Pencil.

Day 17 of the Learn to Draw in 30 Days Challenge –  Draw A Donut And An Airplane

At the very beginning of this challenge you drew a house, a donut, and a airplane to help you measure your progress. On Day 5 of the challenge you drew a house again, this time with instructions from Kistler. Now you’re going to draw a bagel and an airplane once more.

Follow along with the videos below:

How much did you improve? I don’t know about you, but I improved a lot in just 17 days.

Day 18 of the Learn to Draw in 30 Days Challenge –  Draw a Hand

Although a lot of people think that it’s difficult to draw hands, it’s just a matter of drawing some simple shapes. A hand is simply a square, a triangle, and a few cylinders.

Draw a hand by following along with this video: How to Draw Hands.

Day 19 of the Learn to Draw in 30 Days Challenge –  Texture

“Texture” used in the context of drawing refers to the way an object looks as it may feel if it were touched. For example, if you’re drawing a tree, you want to create a bark-like texture. As a second illustration, if you’re drawing a dog you want to create a fur-like texture.

There are different techniques that are used to create the illusion of texture. As an illustration, the book “The Art of Drawing Animals” explains that to draw short fur–on a dog, for example–, you would do the following:

  • Create an undercoat with a series of swift, short strokes with a 2H pencil. Draw the fur in the direction of the fur growth.
  • Use an HB pencil to create a second layer. Don’t cover the entire area–leave some of the page white for highlights.
  • Switch over to a 2B pencil and go over the area again.

That is, texture is created by using different pencil movements, pencils of different grades, creating highlights, and so on. Here are two videos to watch to learn how to create texture:

To practice texture, draw four squares (2″ x 2″ each). In each square, practice one of the following  textures: tree bark; wood, brick, and metal.

You’ll be drawing a squirrel and the squirrel’s fur on Day 28.

Day 20 of the Learn to Draw in 30 Days Challenge – Blind Contour Drawing

Up until this point you’ve been following along as different artists draw some object or other. However, if you want to learn to draw you need to learn how to to “see”. That is, you want to train your brain and your hand to be able to translate what you see into a drawing.

There are many exercises that will help you to do this. Blind contour drawing is one of them. Specifically, it’s an exercise in which an artist draws the contour—or outline—of a subject, without looking at the paper as they draw.

This drawing technique was first introduced by Kimon Nicolaides in his book, “The Natural Way to Draw”. It was further popularized by Betty Edwards. The purpose of the exercise is to strengthen eye-hand coordination.

Draw your left fist using blind contour drawing by following along with this video: Blind Contour Drawing.

Day 21 of the Learn to Draw in 30 Days Challenge – The Vase/Faces Exercise

There’s a famous optical illusion image which is called Vase/Faces, because you can either see a vase, or two faces in profile. One of the drawing exercises recommended by Edwards involves the following:

  • She gives you a template with one side of the vase (or with one face in profile).
  • You have to complete the other side.

Go ahead and do this exercise. Download the template here. Then, complete the exercise by following along with this video: Vase/Faces Tutorial.

Day 22 of the Learn to Draw in 30 Days Challenge – The Grid Method

The Grid Method will help you to reproduce an image that you’re trying to draw. It consists of taking the image and drawing a grid over it. Then, draw a grid of equal ratio on the paper you’re going to draw the image on. Lastly, you draw the image, one square at time.

Read this explanation on how to use the grid method: The Grid Method. Then, use the grid method to draw a horse (or the head of a horse) by following along with this video: How to Draw a Horse.

Day 23 of the Learn to Draw in 30 Days Challenge – Upside Down Drawing

Edwards argues that by drawing upside down you can create a shift between your left brain–which is logical and lineal–and your right brain. Theoretically, right brain thinking will allow you to access your ability to draw.

Upside Down Drawing will allow you to the following:

  • Learn to see lines in relation to each other, rather than as preconceived shapes.
  • Develop observational skills.

Do the following:

  • Take an image and turn it upside down.
  • Then, copy it. Just draw the shapes and lines that you see, without trying to make sense of what you’re drawing

You can use the image below:

In addition, draw the image by following along with this video: Upside Down Drawing.

Day 24 of the Learn to Draw in 30 Days Challenge – Drawing Negative Space

Another exercise recommended by Edwards is drawing negative space. Positive space refers to the main focus of a picture, while negative space refers to the background. In negative space drawing, instead of observing the positive shape of an object, you draw the shape of the space around the object.

Here’s a great explanation of how to draw negative space: Positive and Negative Space.

Now, grab a pair of scissors, place it on a white sheet of paper, and draw the negative space around the scissors. Then, take some paper clips and do the same thing. You can follow along with this video: Positive Negative Space.

Day 25 of the Learn to Draw in 30 Days Challenge –  One Point Perspective

What is perspective? Perspective is all about creating depth in your drawings. Here’s a quick introduction to perspective in drawing: Understanding Perspective.

One-point perspective is when everything converges toward one vanishing point on the horizon. It’s  typically used for roads, railroad tracks, or hallways. Draw this city landscape using one-point perspective: One-Point Perspective Cityscape.

Day 26 of the Learn to Draw in 30 Days Challenge –  Two Point Perspective

Two-Point perspective uses two vanishing points on the horizon line. In this type of perspective, you are viewing the object or scene so that you are looking at one corner, with two sets of parallel lines moving away from you.

Draw this bedroom in two-point perspective: Two-Point Perspective Bedroom.

Day 27 of the Learn to Draw in 30 Days Challenge – Draw a Still Life

A still life is a genre of painting. Specifically, it’s a painting or drawing that features an arrangement of inanimate, everyday objects. These objects often include a vase–with or without flowers–, a piece of fruit, and a bottle of wine. This genre is great for those who are learning to draw because it teaches you to see like an artist.

In addition, drawing still lives will teach you proportion. Look at the following:

  • You want to maintain the right proportion between the  height and width of an object.
  • When an object has different sub-parts it’s important to draw the sub-parts the right size in relation to each other.
  • In addition, each object has to have the correct proprotion in relation to the other objects that make up the still life.

Here are some guidelines for drawing a still life:

  • Spend some time observing the composition.
  • Simplify the forms. What basic shapes do you see in each object?
  • Start drawing the shapes that you see in a rough fashion (a circle for an apple, a long cylinder for a candle, a rectangle for a book, and so on). Use a light pencil; you’ll erase most of these lines later.
  • Use a pencil to measure proportions.
  • Just draw the essential lines at this point. You’ll be adding in the details later.

Follow along with the instructions you’ll find in this blog post, and draw the still life below.

Day 28 of the Learn to Draw in 30 Days Challenge –  Draw a Squirrel

You’re going to practice drawing texture by drawing a squirrel. Follow along with this video to draw the basic outline of the squirrel and get a general idea on how to create the fur texture for the squirrel: How to Draw a Squirrel.

Then, get the details on how to create the squirrel’s fur in this video: How to Draw Fur.

Day 29 of the Learn to Draw in 30 Days Challenge – Draw a Face

The face has very specific proportions that you need to adhere to if you want to draw it realistically. Here are some guidelines:

  • The eyes are halfway down the head.
  • The edge of the nostrils line up with the tear ducts of the eyes.
  • The space between the eyes is the same as the width of each eye.
  • The head is five eyes wide.
  • The corners of the mouth line up with the pupils of each eye.

Draw a quick and simple girl’s face by following along with this tutorial: How to Draw a Female Face.

Day 30 of the Learn to Draw in 30 Days Challenge – Choose An Object to Draw

For Day 30, choose an object and draw it. As an illustration, you can choose to draw one of your running shoes. Use any of the techniques that you learned during the last 29 days to draw it. He are some possibilities:

  • Identify the different shapes that you see in your running shoe and draw those shapes. Then, fill in the details.
  • Make a blind contour drawing of it.
  • Take a photograph of your running shoe and print it out. Draw a grid on the photo. Then, draw a grid on a piece of paper, and draw the running shoe that way.
  • Draw the negative spaces around the shoe.

Here are some more ideas.

Conclusion

Did you enjoy the 30-day drawing challenge?  How much did you improve? Live your best life by learning to draw.


banner make it happen

one hour a day header-2

guidebook of dreams banner how to be creative banner

Related Posts:
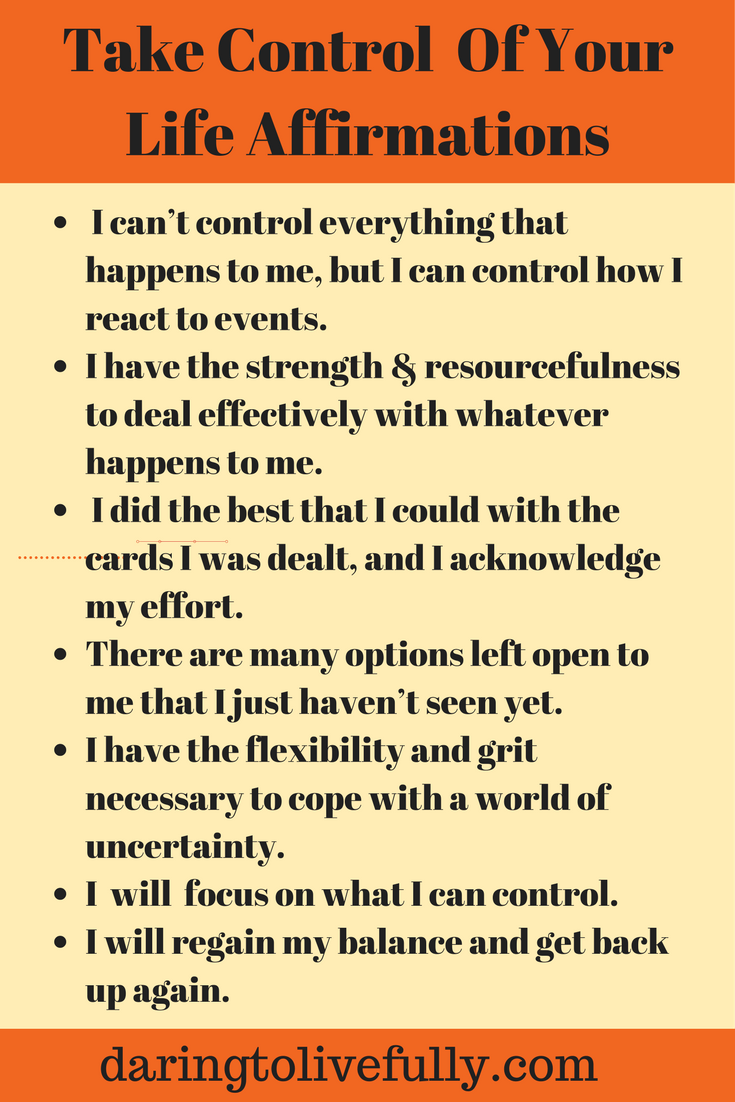
Did you enjoy this article? Subscribe to “Daring to Live Fully” by clicking here and get free updates.